
Reviews impact revenue.
How, you ask?
As per a report, 20% of online sales are review-driven. And rightly so; 77% of the online shoppers on Amazon check product reviews before making a purchase.
Doing simple math, this makes reviews worth USD 660 Billion i.e., 20% of the global eCommerce revenue, which for the year 2022 was USD 3.3 Trillion.
Businesses, be they direct sellers, third-party sellers, drop shippers, or affiliate marketers are scraping Amazon product reviews to tap into the immense value that authentic reviews by real-world users behold.
In case, if you’re new to the web scraping or data extraction universe, you might not be acquainted with the use cases of website data scraping, and so, you might be wondering “What value one can get from extracting product reviews?”
Well, Amazon product reviews help you track competitor product’s strengths & weaknesses; identify new product development insights; and accordingly, shape your own strategy.
That’s not all. Scraping Amazon reviews helps you-
- Gain pricing intelligence that enables you to rightly price your new products, and provide appropriate discounts on your products such that it drives higher sales.
- Get a good pulse of customer sentiments about competitor products and your own products.
- Smartly select and recommend best-performing products for your dropshipping & affiliate business.
- Improve your customer service*.*
Tackle spam****reviews for your products on/off Amazon.
So…? Aren’t reviews priceless & pivotal for driving revenue?
Read this blog to know how to scrape Amazon Product Reviews using the open-source Python framework Scrapy and a lightweight headless browser Splash.
Note: This tutorial is only for educational purposes. For scraping amazon reviews you don’t need splash. There is no need to login either. But some complex websites do require you to use headless javascript rendering browsers like splash, and even need you to login if you seek to extract the data from those websites.

Automated Reviews Scraping
Scrape product reviews from leading online eCommerce websites- both B2C marketplaces, as well as B2B marketplaces. Our eCommerce product reviews web scraping services help you extract product reviews data at scale in the format you need to enable your team to squeeze intelligent insights from it, and help your business make more data-driven, more profitable!
Web Scraping Amazon Product Reviews
This blog is a step-by-step Amazon product review scraping tutorial. It will help you write your own Python scripts, aka Spiders in Scrapy. This Python script will automate the Amazon product review data extraction process.
- If you’re a beginner web scraping developer, let’s go through the step-by-step process to scrape Amazon product reviews.
If you’re already well versed with Scrapy and Splash, let’s cut to the chase, here’s your Python script for scraping Amazon product reviews using Scrapy & Splash.
Intro To Scrapy, Splash & The Tools We Use in This Amazon Reviews Scraping Tutorial
First, you must be acquainted with a few web scraping tools, technologies, and fundamental concepts that are a must to make the most of this Amazon reviews scraping tutorial.
For instance, you should understand-
- What’s Scrapy?
- What’s Splash, Splash HTTP API, and Lua Script?
- What’s Scrapy-Splash?
- What’s Docker?
What’s Scrapy?
Scrapy is an open-source web scraping Python framework to help you write crawlers, aka Python scripts that automate data extraction from the web.
It’s one of the most widely used web crawling & web scraping frameworks for Python language.
It works on all 3 commonly used operating systems— Linux, Windows, and macOS.
You would need Python 3.8+ for the latest version of Scrapy to work flawlessly on your system.
Here’s a guide to get you started with Scrapy. If you’re new to Scrapy, follow that guide for a starter project. And then, continue back with this Amazon product reviews scraping tutorial.
What’s Splash, Splash HTTP API, and Lua Script?
Splash is a lightweight headless web browser that enables you to render complex Javascript websites as it would in a normal web browser like Chrome or Safari.
It lets you interact with the website through HTTP API & Lua Scripts. Splash HTTP API is an endpoint to which you can make GET & POST requests to load web pages. Using Splash, you can also execute custom javascript code written using Lua Script.
All this plays a crucial role in scraping complex AJAX/javascript rendered dynamic websites.
What’s Scrapy-Splash?
It’s a Scrapy plugin library that helps you use Splash natively in Scrapy. It provides you with methods such as SplashRequest to help you render URLs using Splash server.
What’s Docker?
In simple words, Docker is a tool that lets you build containers, aka standalone executable packages.
These containers package an application’s code, runtime, system tools, and dependency libraries such that they can be deployed and run across different environments.
Consider Docker containers as your off-the-shelf software, which you just need to run with a single or a few commands.
A good analogy could be with a packaged ready-to-cook meal, which you only need to heat in order to consume it.
But how is Docker relevant to this tutorial?
Well, Scrapy-Splash gets served as a Docker Image. It must be running for Splash to do its magic.
Anyway, now that you are acquainted with the high-level tools that you will use in this tutorial, let’s get the ball rolling.
Extract Product Reviews Data For Advanced Analytics and Insights
Feast upon 1000s of product reviews to gain actionable market insights.
Customer Sentiments
Extract eCommerce product reviews data to understand customer sentiments, and address pain points with advanced sentiment analysis. You can easily get this data by leveraging DataFlirt’s eCommerce product reviews web scraping services.
New Product Development
With eCommerce product reviews web scraping, you get the data you need to analyse what product features your/competitor’s customers applaud or complain about; this helps you improve existing products, or to develop new products.
Step-by-step Process to Scrape Amazon Product Reviews
First things first, you need to have Python 3.8+ in your development environment.
You also need pip3.
Step 1: Validate that you’ve Python 3.8+ & Pip3 installed.
-
Open up the terminal on Windows, Linux, or MacOS
-
Run this command to check your Python version
python3 -V

It will give you the version of Python installed on your system.
Here, it is Python 3.9.6.
Alternatively, you can also run any of the following commands-
python3 –version
python –version
python -V
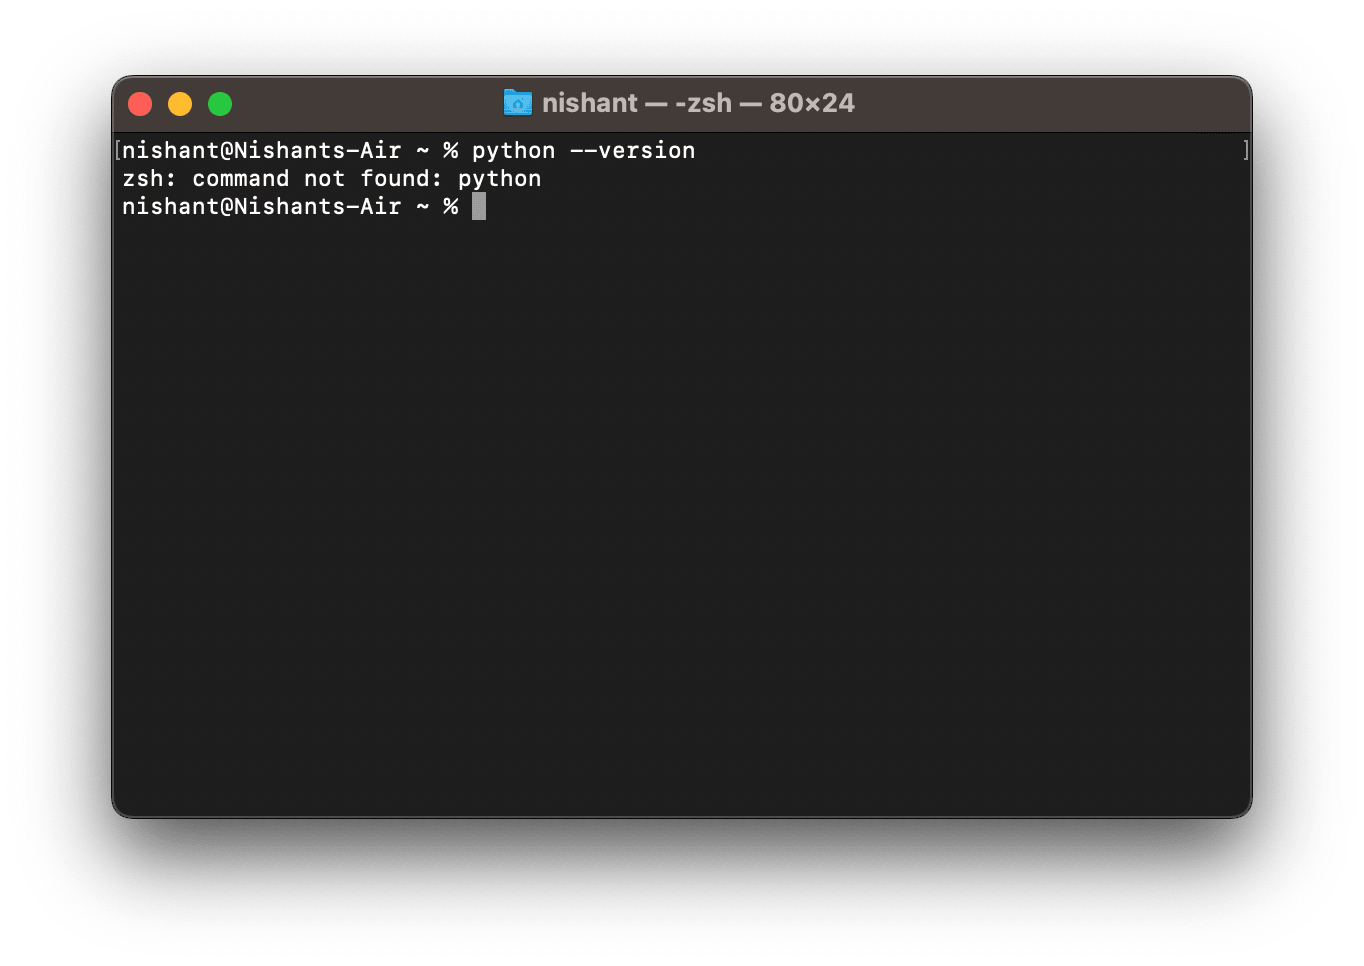
If you get the error message “command not found”, it either means Python is not installed in your system, or the PATH variable is not set to point to the executable python3 file. Here’s a guide to installing Python on your Linux, Windows, and macOS.
- Similarly, run this command to check if pip is installed and its versionpip3 -V
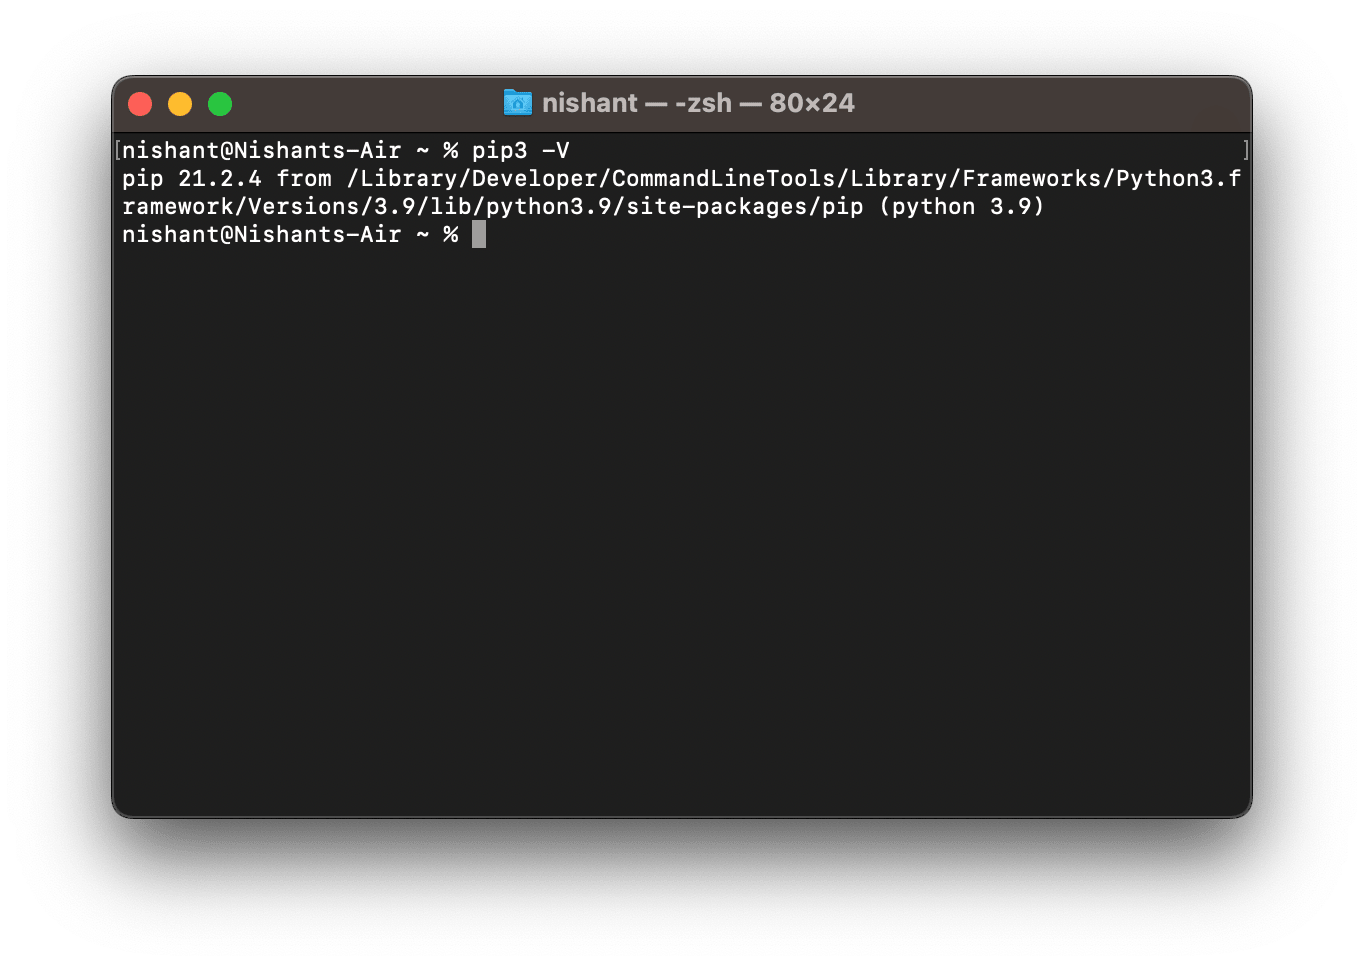
It will give you the version of pip3 installed on your system. In the above case, it is 21.2.4.
Alternatively, you can also run any of the following commands-
pip3 –version
pip -V
pip –version
As it was for Python, if you get a command not found message for pip, it simply means that either pip is not installed, or it’s not added to your system’s PATH.
In general, pip3 comes bundled with python3. And it shouldn’t be a problem to get going with it.
But if you are facing challenges, follow this documentation to install pip on Windows, Linux, and macOS.
Step 2: Create a python virtual environment
-
A virtual environment will ensure that the packages & libraries you install for scraping Amazon reviews won’t interfere with the libraries & packages installed globally on your system.
-
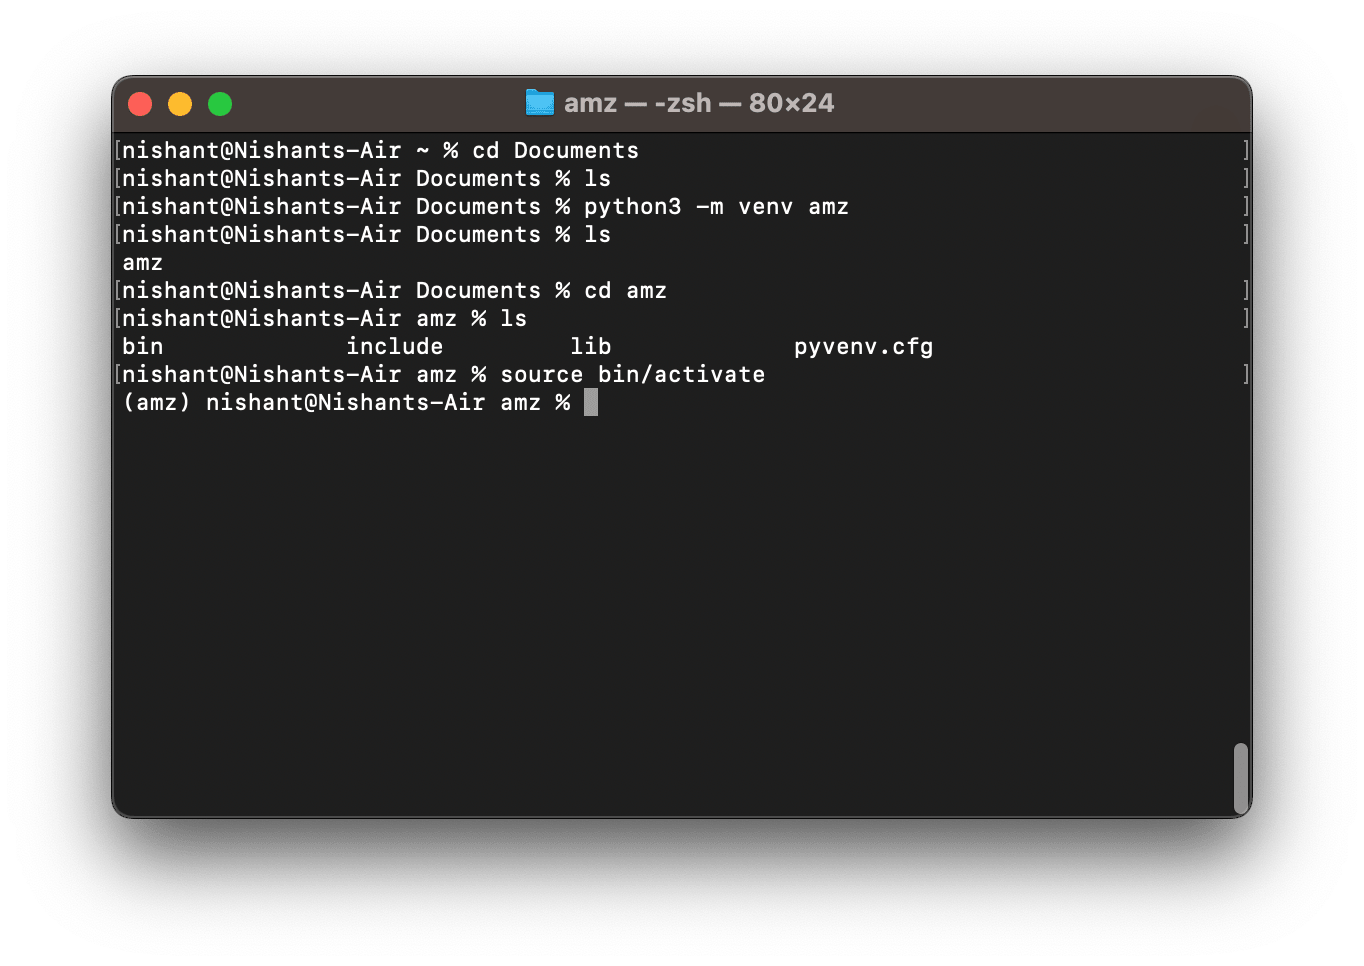
To create a virtual environment using Python venv on Windows, macOS, or Linux, run the following command in the terminal. Replace python3 with python*,* if in your PATH python maps to the python3 executable file.
python3 -m venv projectEnvironmentLocationHere, projectEnvironmentLocation can be a directory address on your system, or it can be just a folder within which you would want to create your isolated environment. For example,python3 -m venv amzFor a demonstration of scraping Amazon product reviews, here the file is named amz.
Once you run the command, you will observe that a new folder is created in your directory.
The last part of creating a Python virtual environment is to activate it.
On Linux and MacOS, you can do so by executing the command-
source amz/bin/activateIf you named your projectEnvironmentLocation as something different from amz, then edit the above command accordingly.
To ensure that your virtual environment has been activated, look for a virtual environment indicator on the extreme left of the terminal prompt.
If it’s there, the game is on.
Here’s what we have done so far-
Step 3: Install Scrapy, Scrapy Splash
-
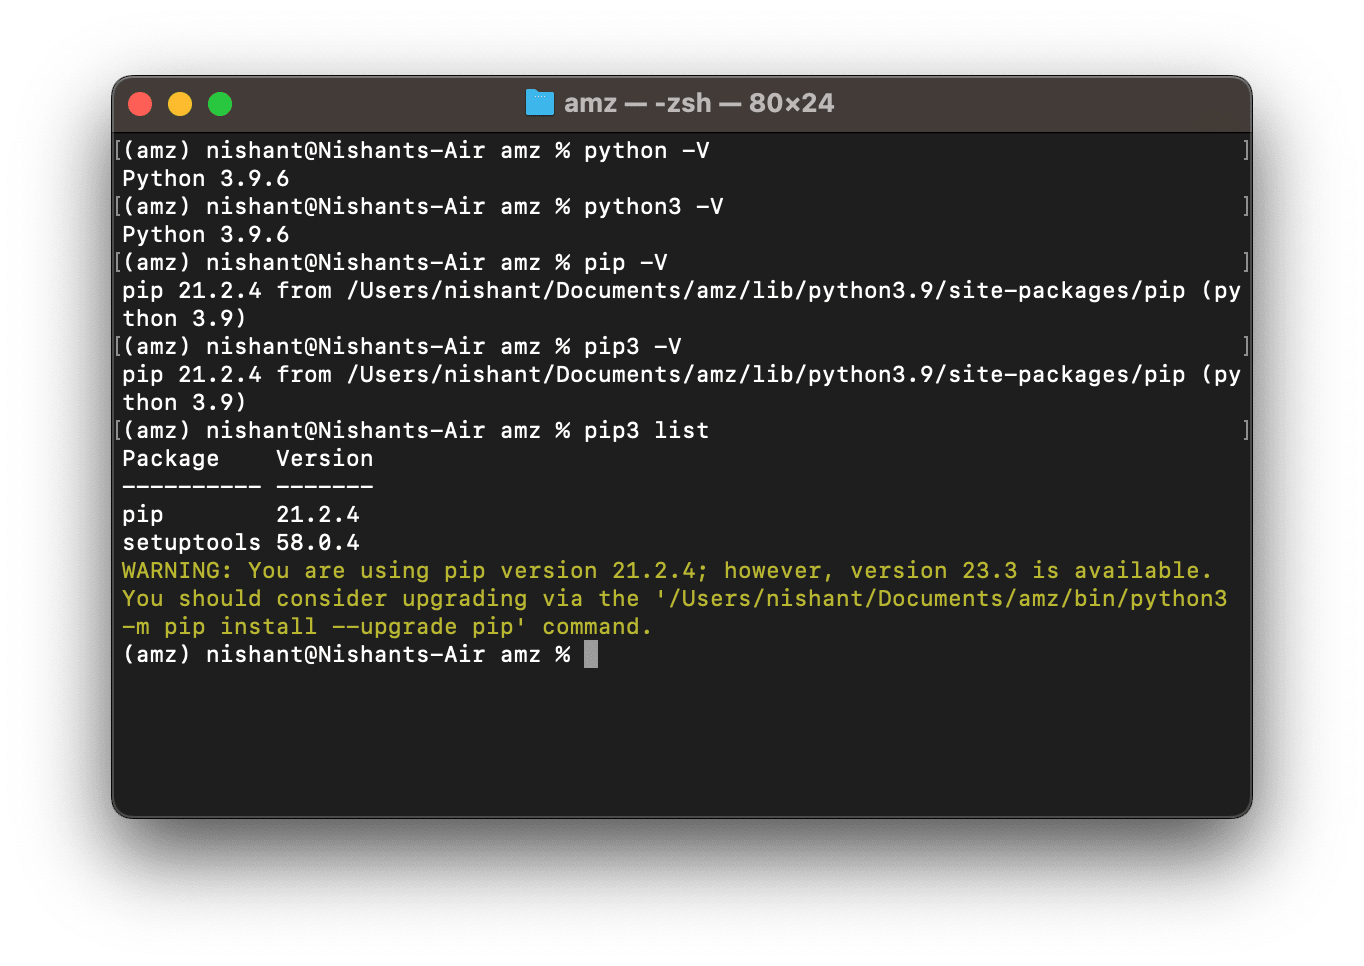
Inside the newly created Python virtual environment, you would notice that both Python and Python3 symbolic notation maps to the same Python version. Similarly, pip & pip3 maps to the same pip version.
-
Besides, if you run the command pip3 list*,* you’ll notice that there are no other libraries installed in this Python virtual environment. Only, pip & setuptools.
-
So, now you can install Scrapy in the virtual environment by running the following command-
****pip3 install scrapy
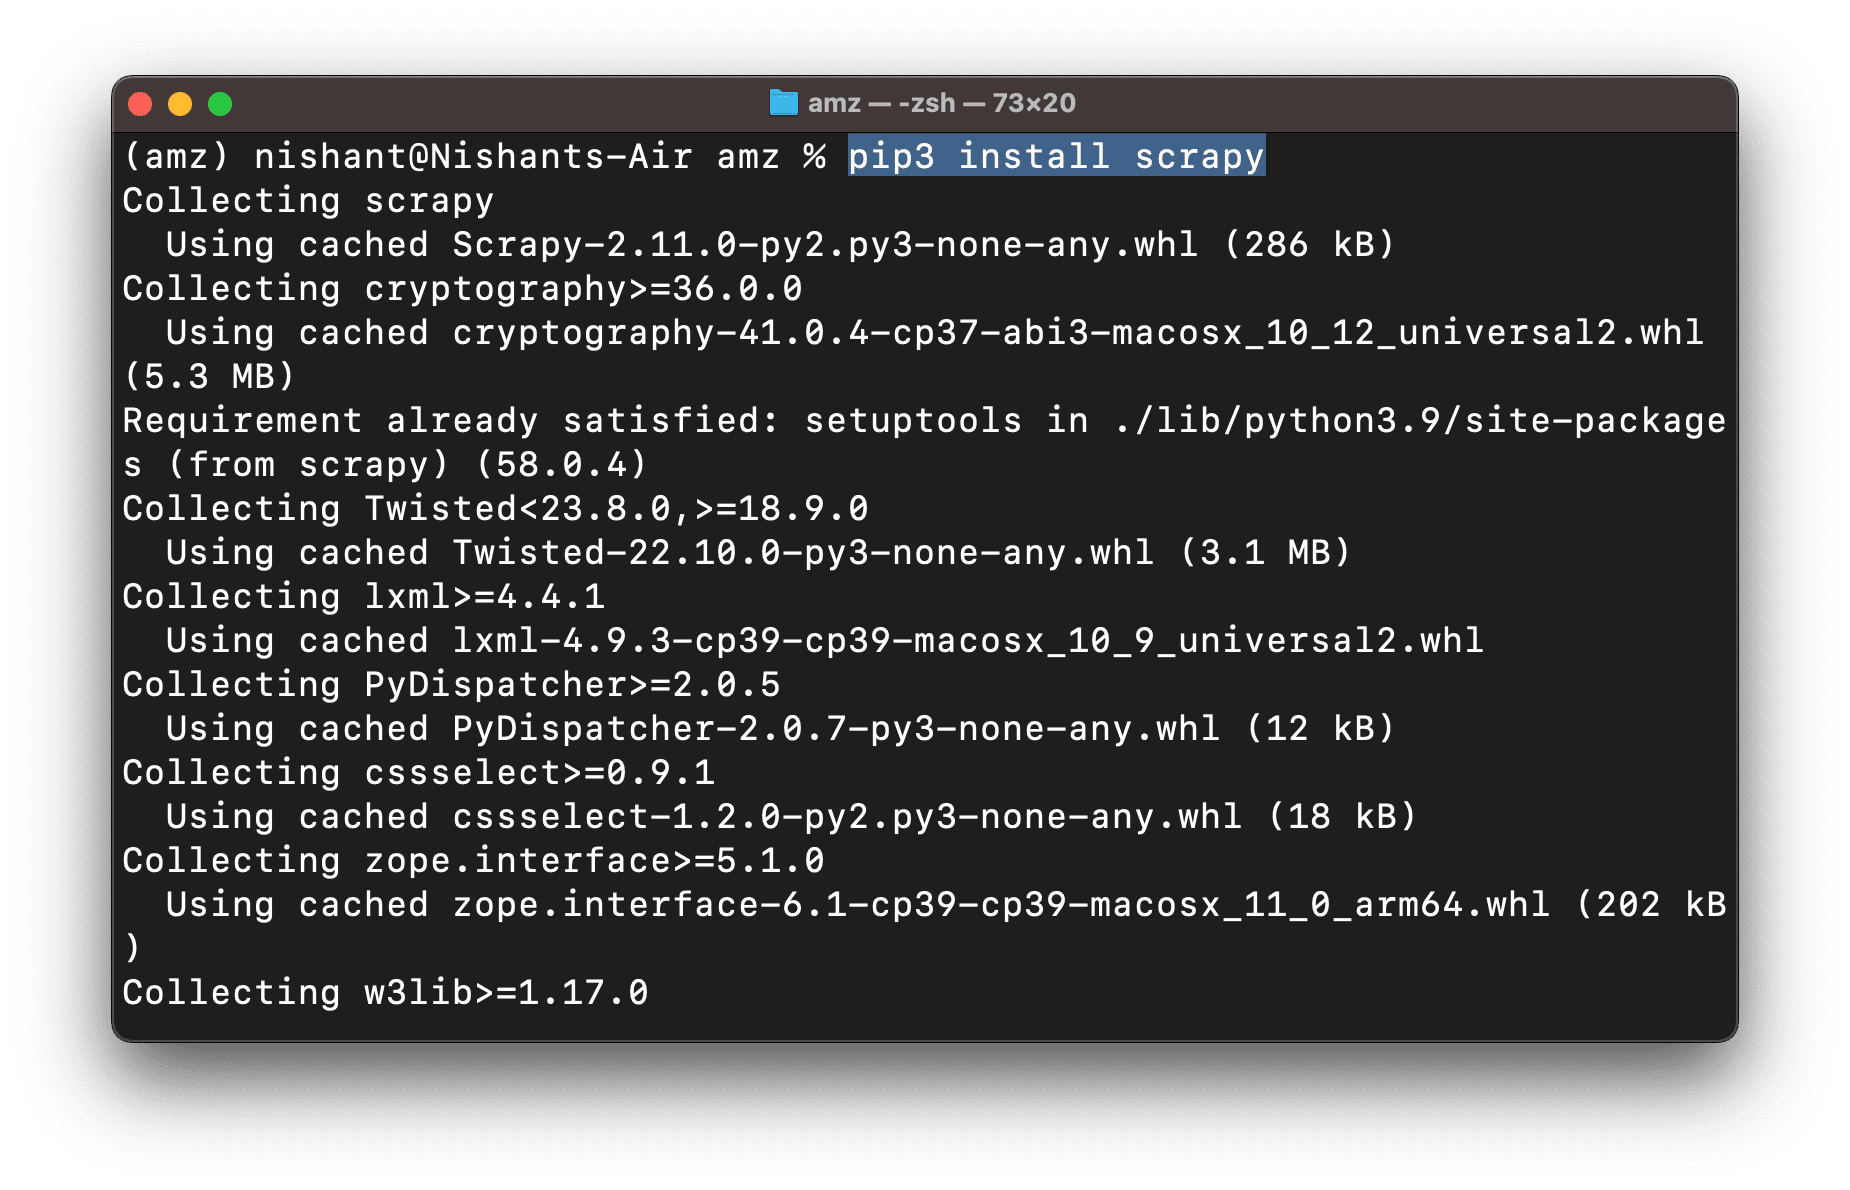 ****
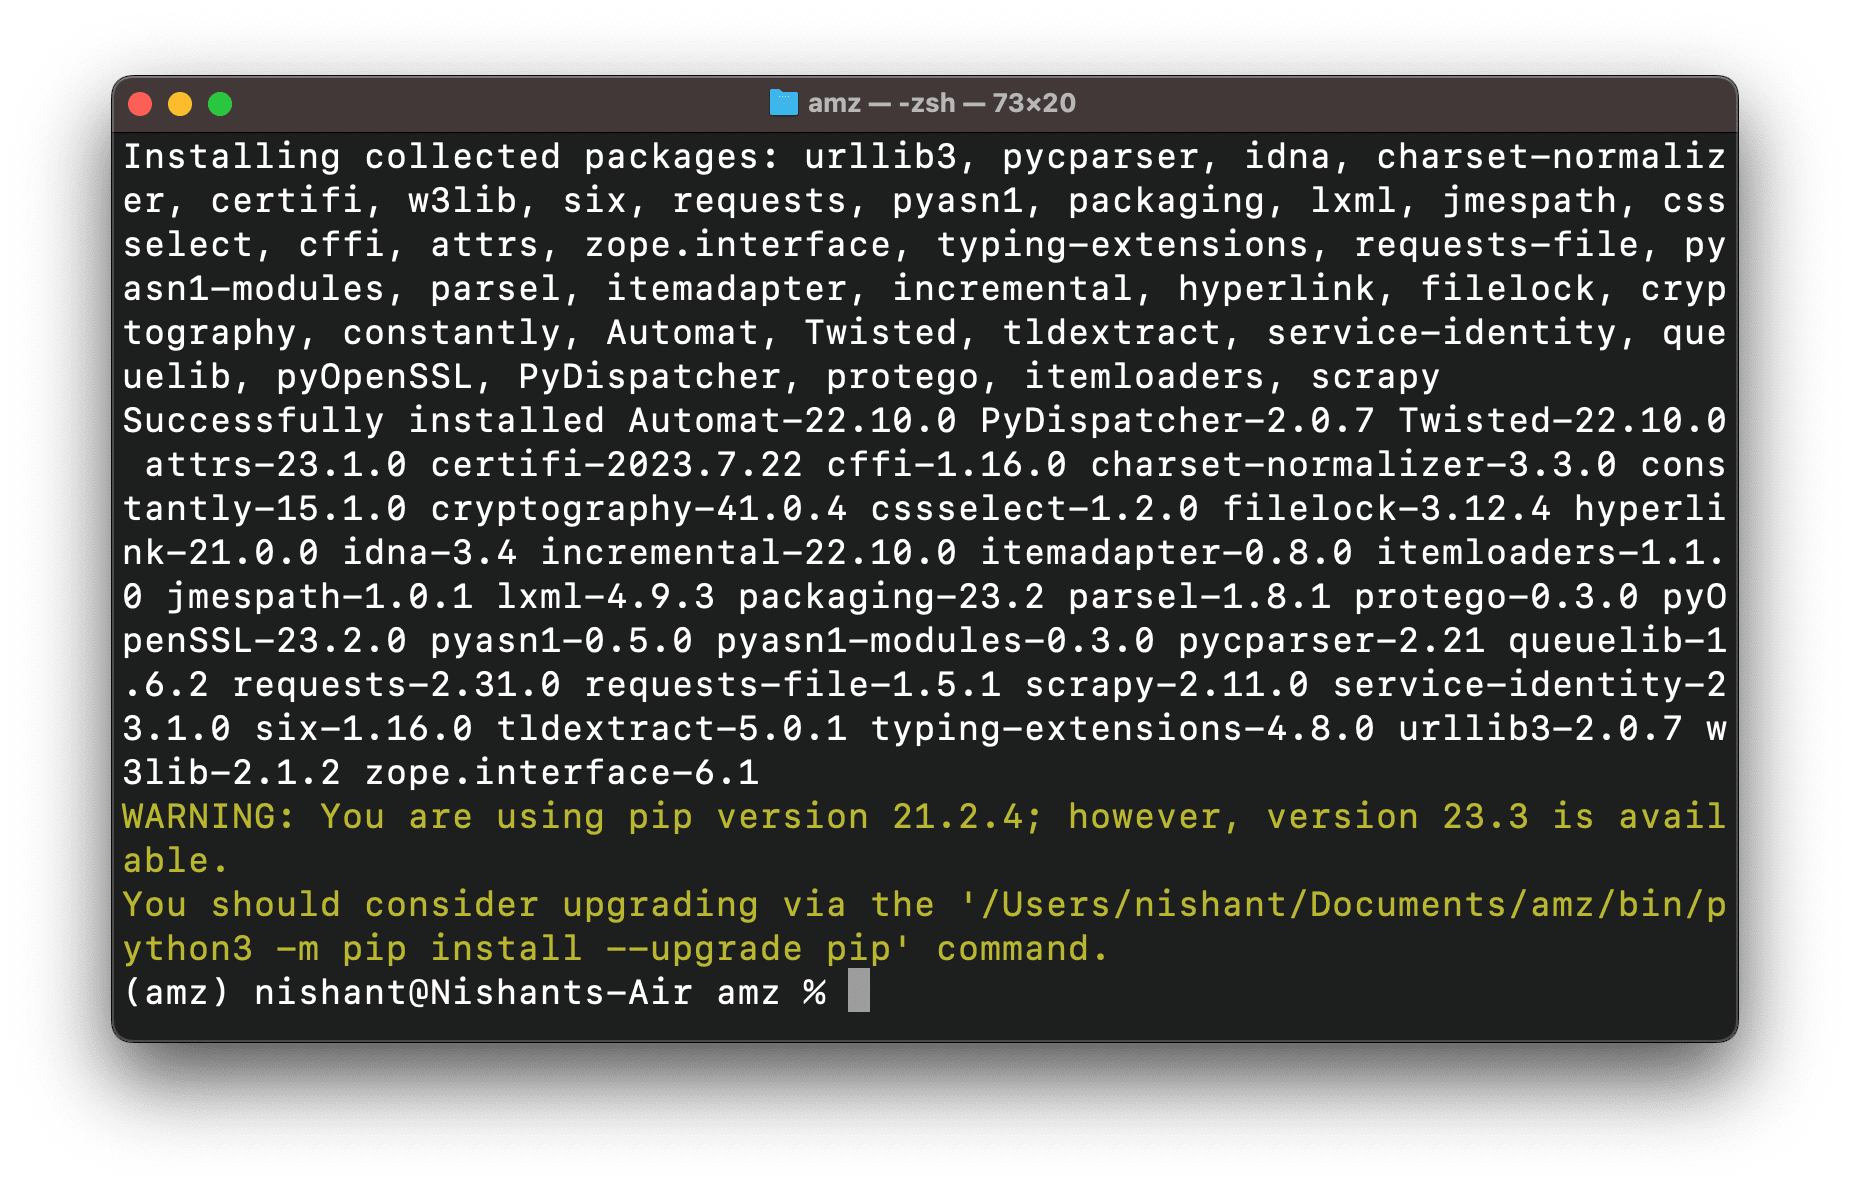
****It would install all the dependencies such as urllib3, lxml, w3lib, requests, etcetera.
Now, if you run, pip3 list*,* it will give you the list of all the packages installed-
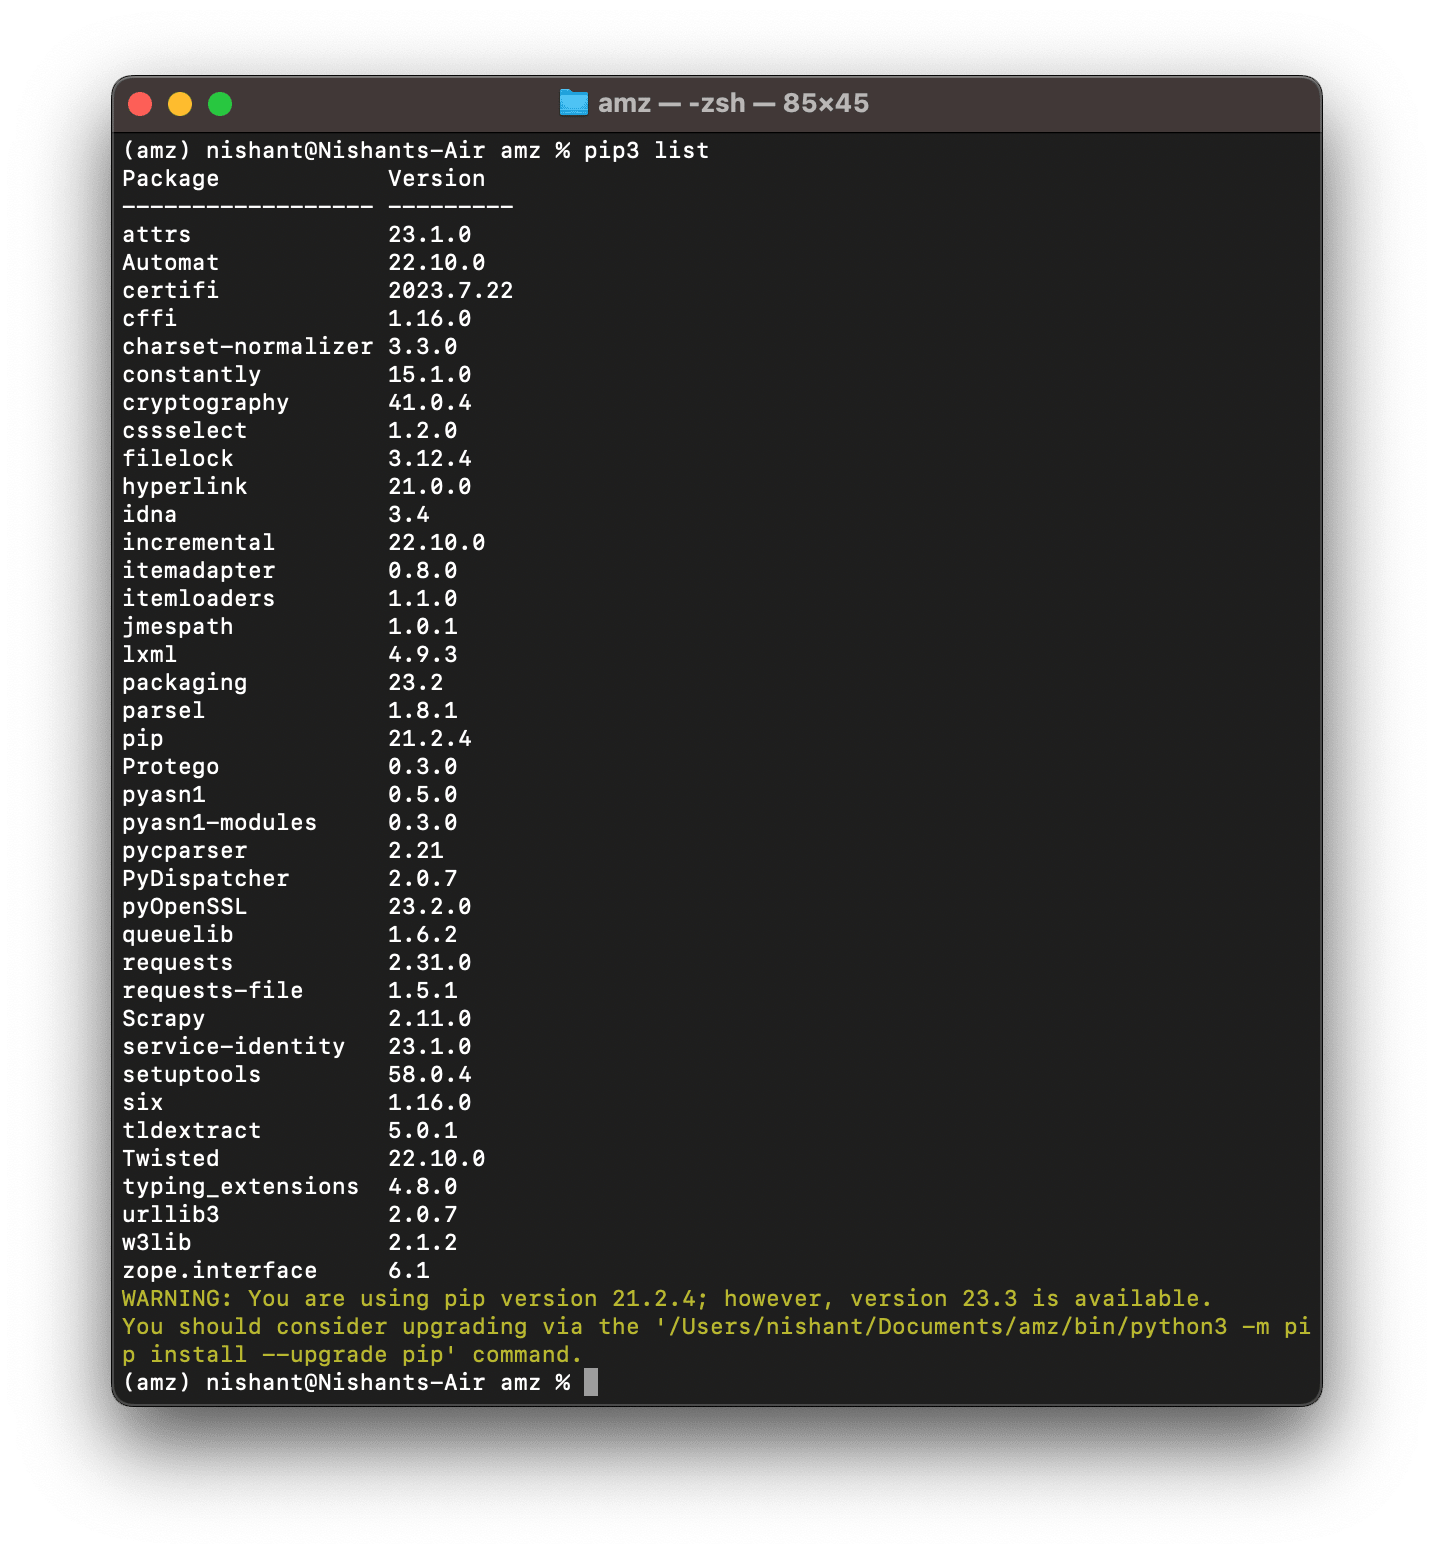
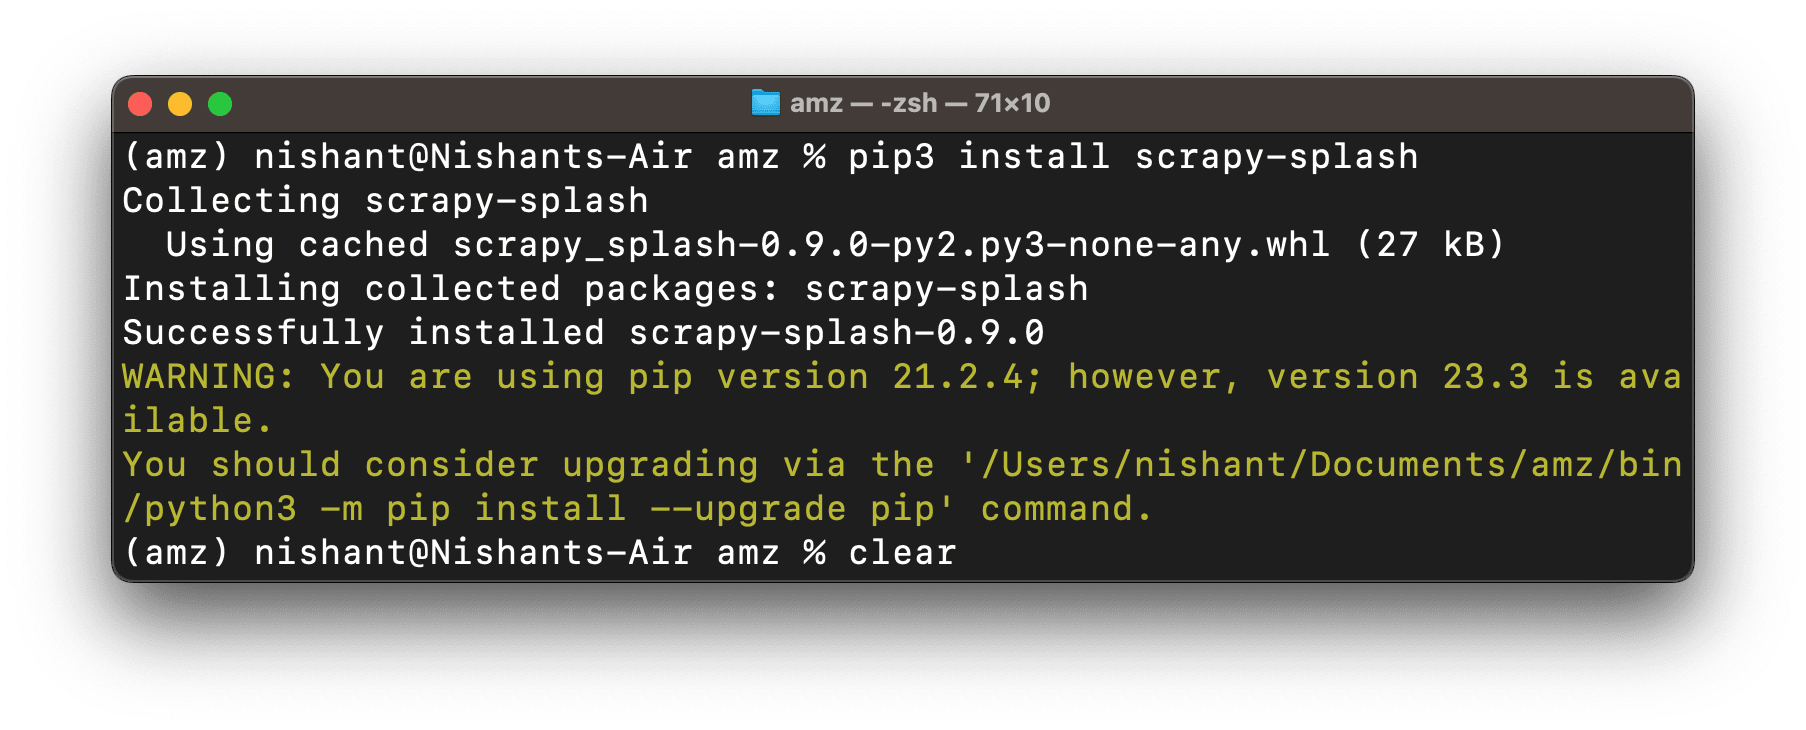
Brilliant. But did you notice, there is no Scrapy-Splash package?
You need to install that too. Run the following command-
pip3 install scrapy-splash
Step 4: Pull the Splash image from Docker and run it.
First, if you don’t have docker installed, follow this guide to install Docker.
Enter ‘docker’ in your terminal, then press enter to check if you have docker installed on your system.
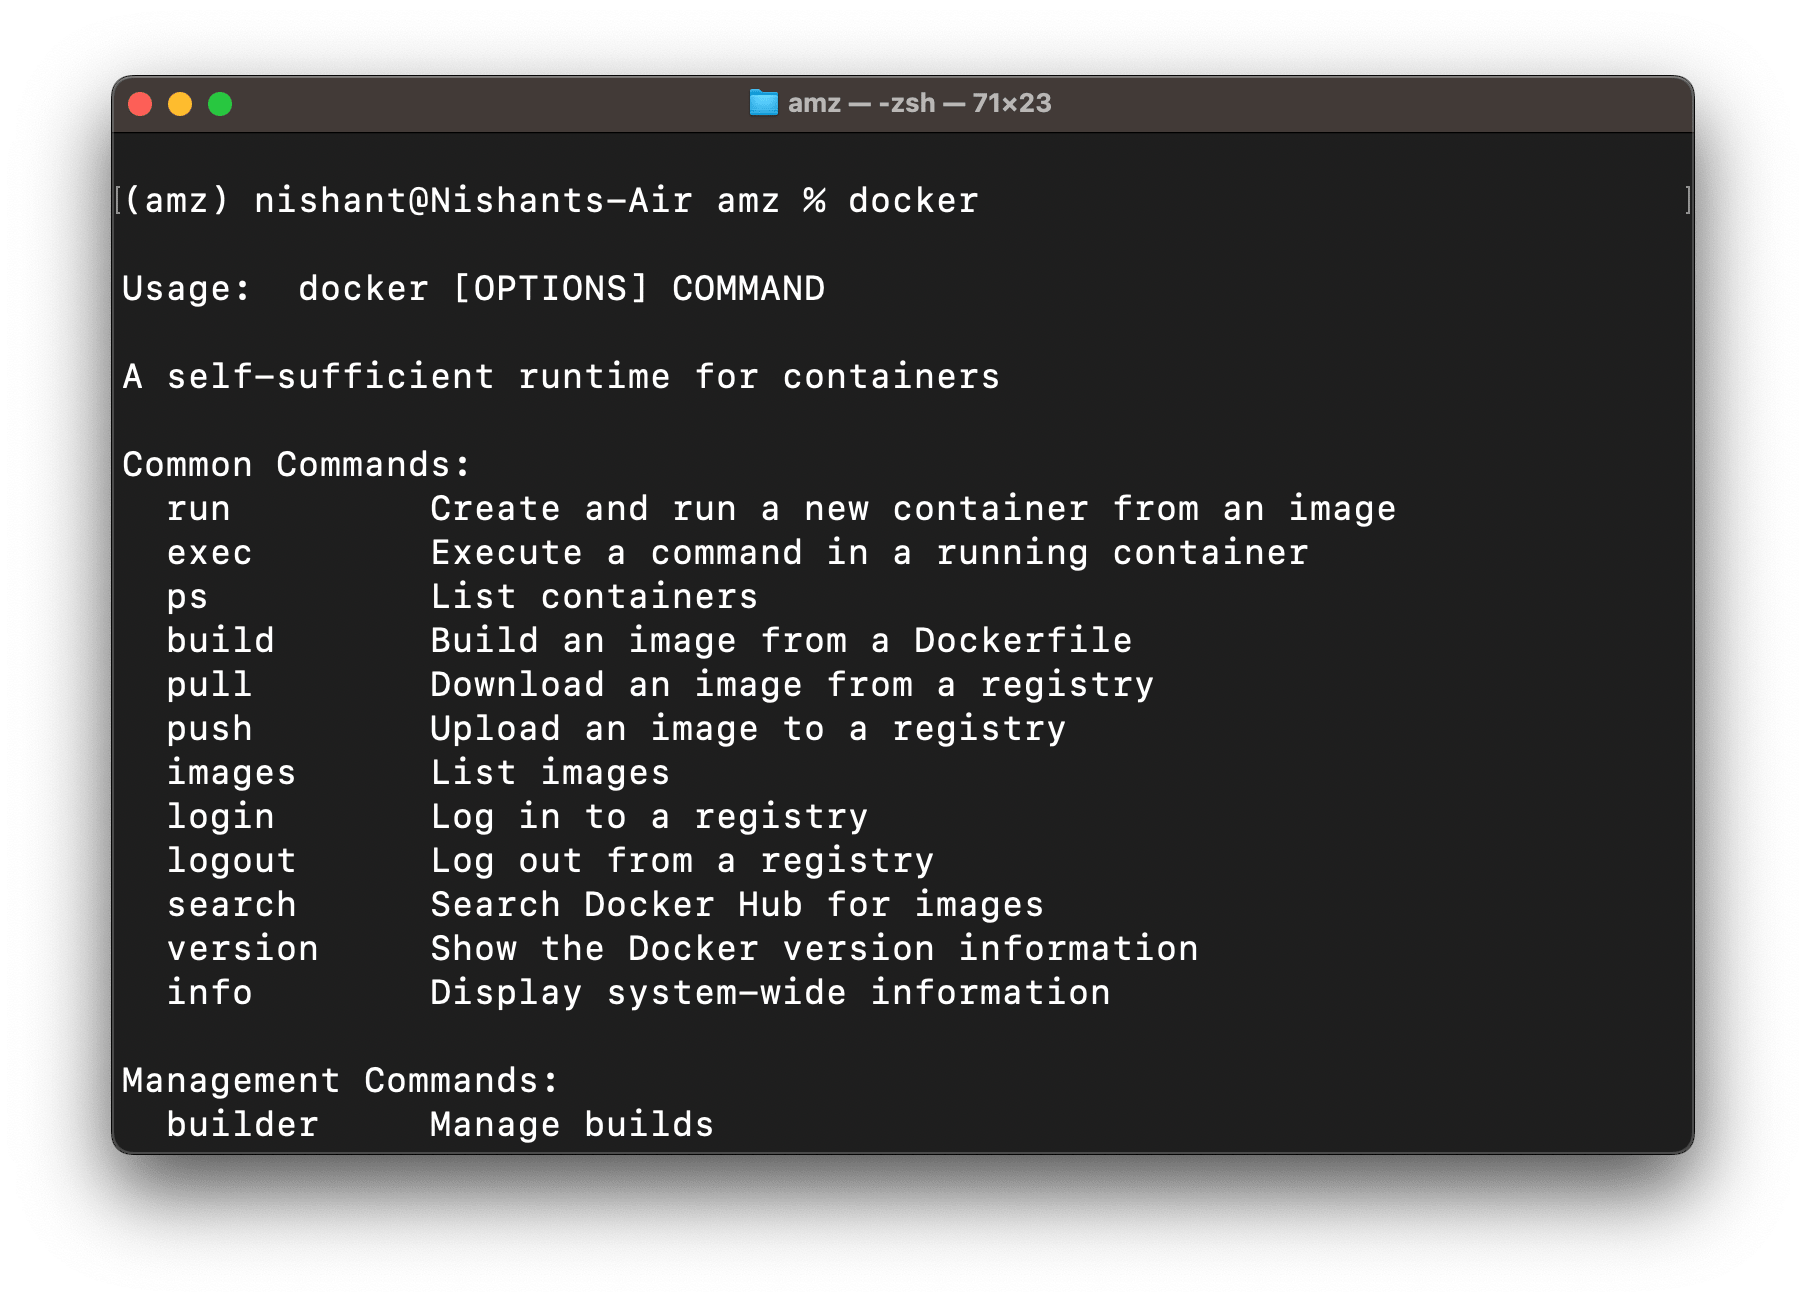
If you see the above screen, docker is installed on your system. Locate the Docker desktop in your system and launch it.
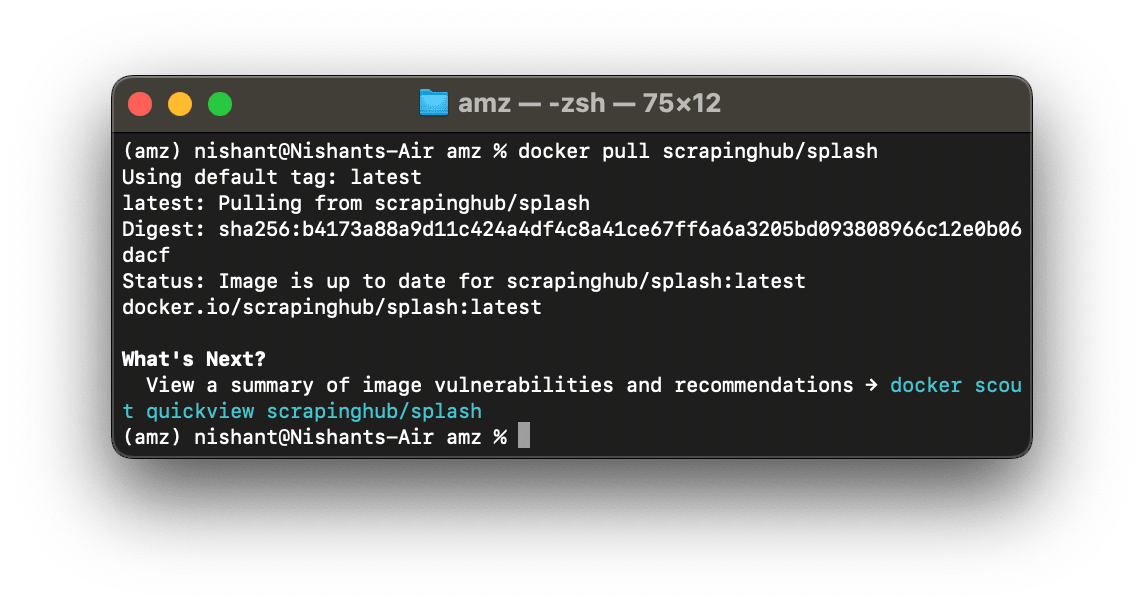
Next, in the terminal, execute the following command-
docker pull scrapinghub/splash
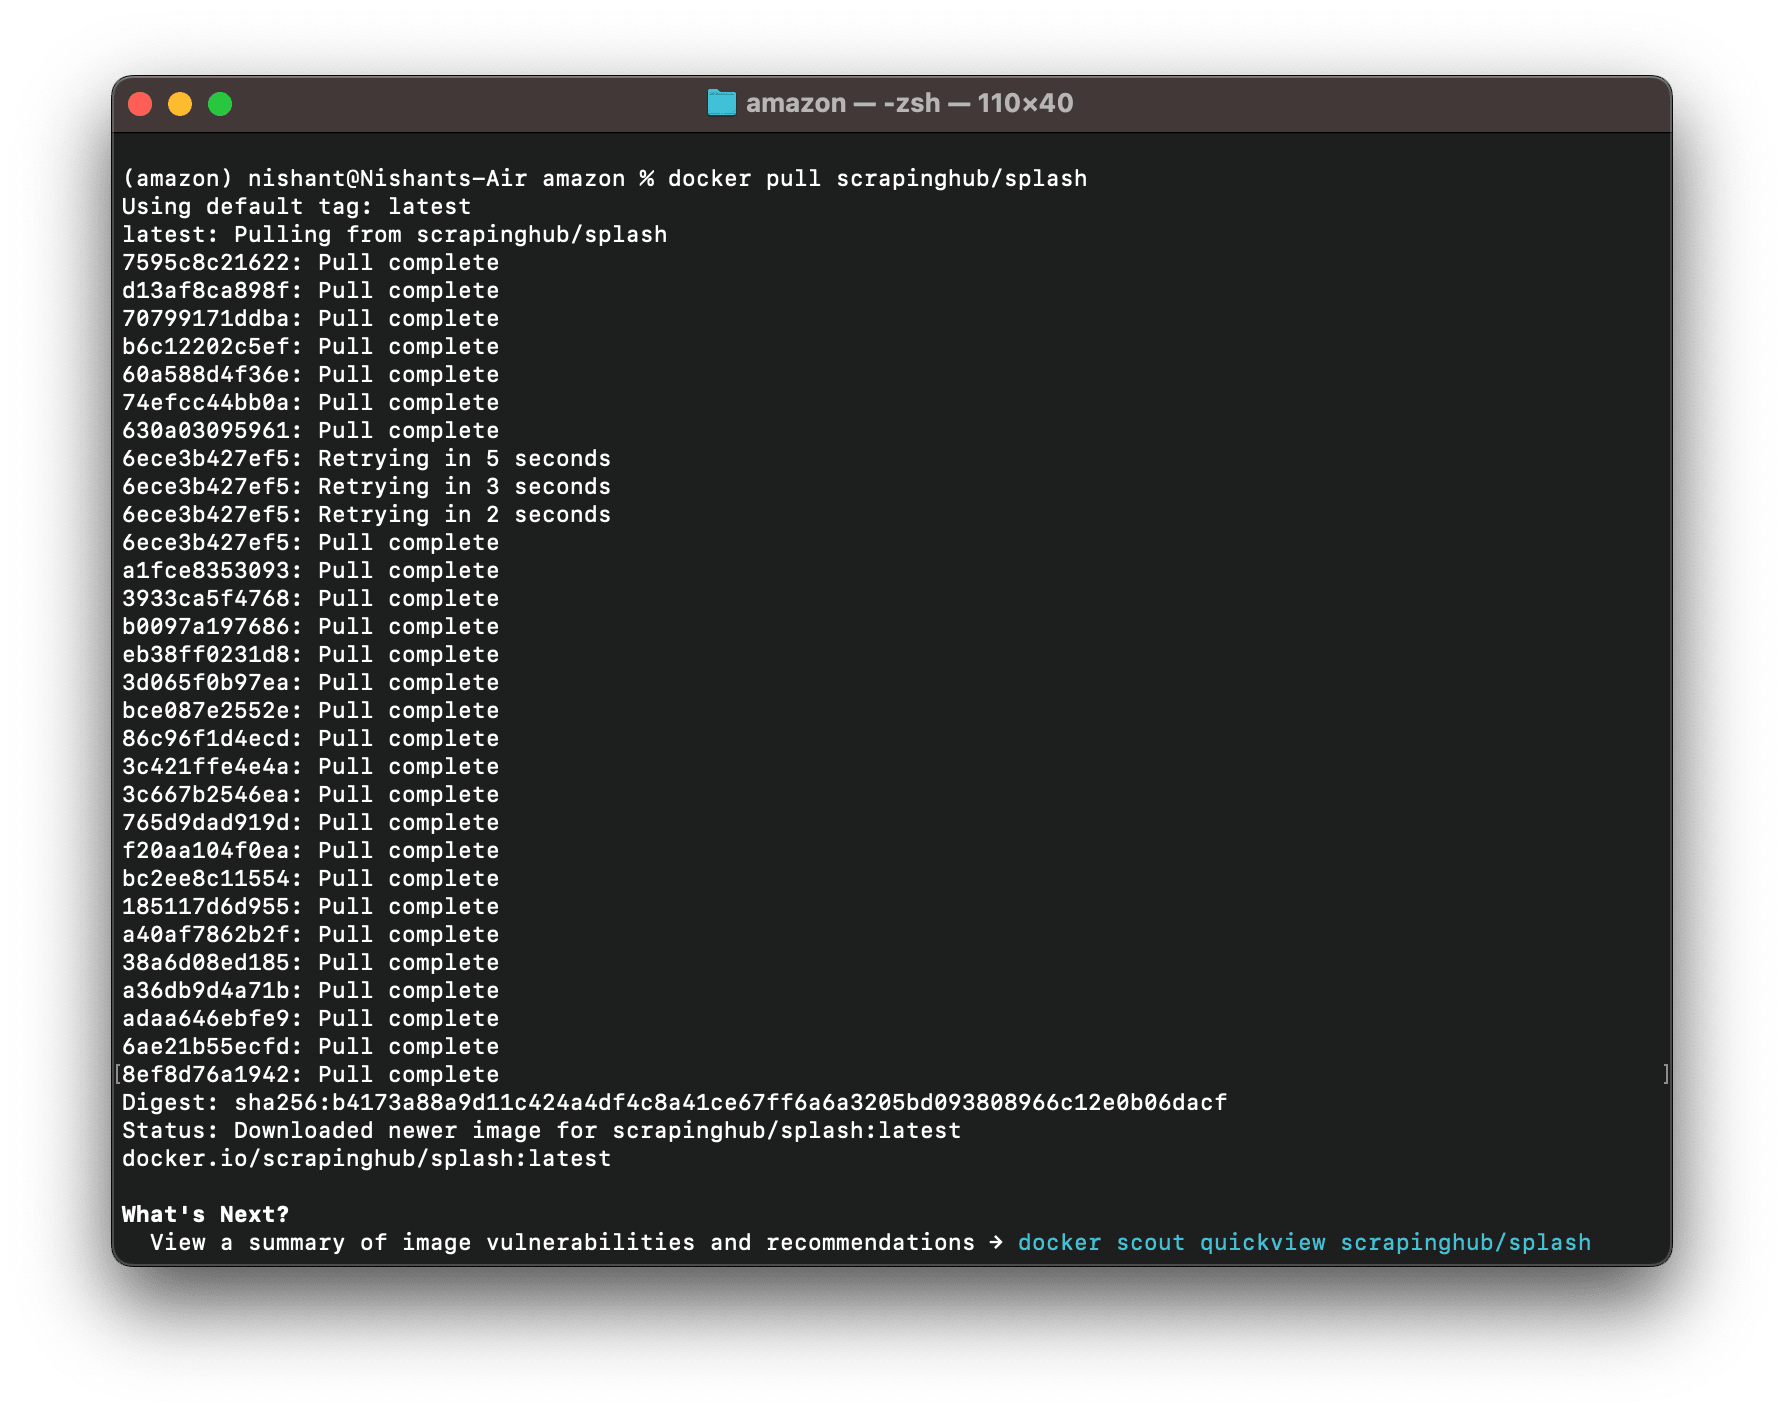
It will pull the splash image.
If you already have an updated splash image on your system, it will show you the status that the image is updated.
Open your docker desktop application, and move to the images section from the left menu panel. You will find the list of docker images installed on your system. Here, it’s just Splash.
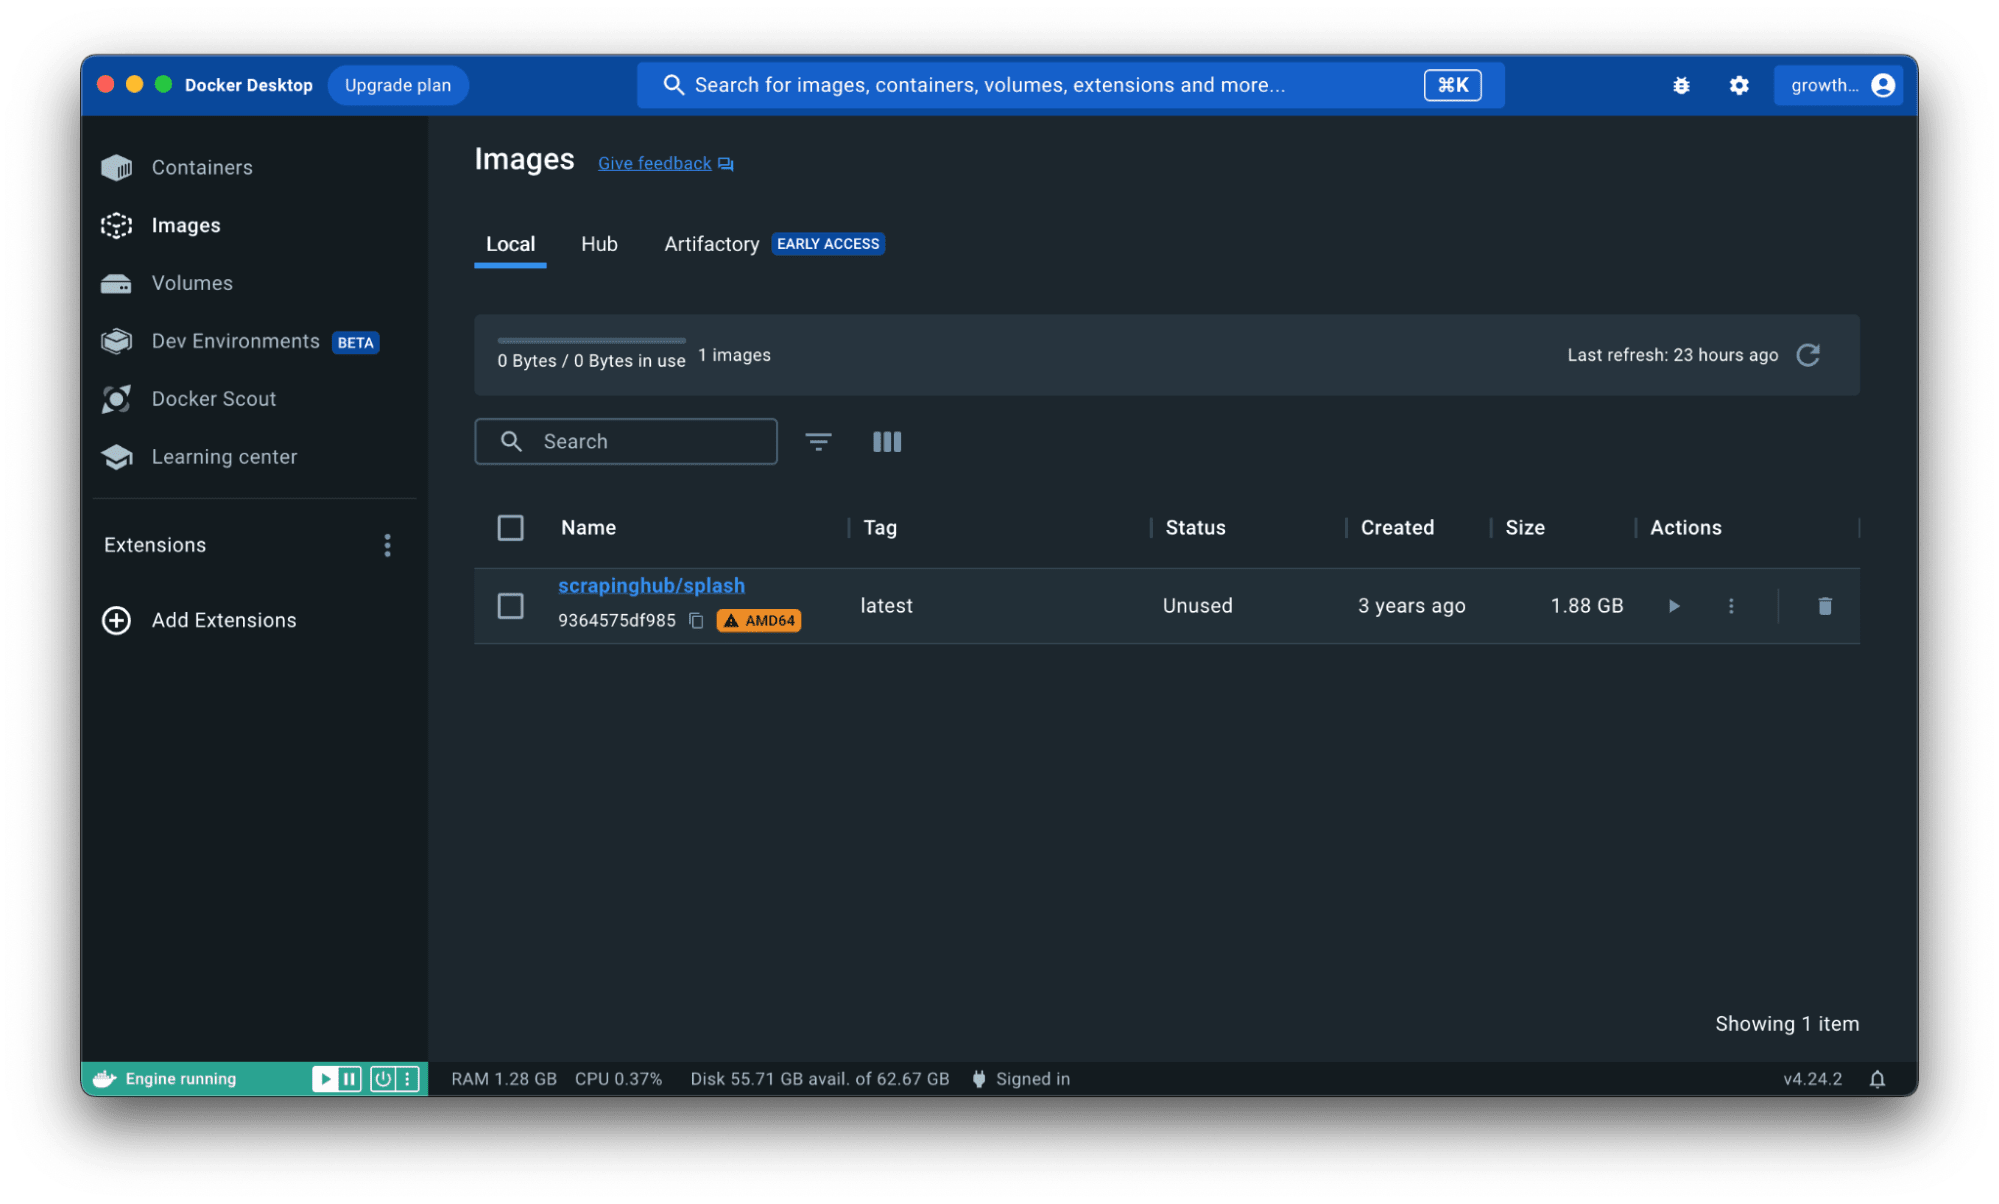
Notice that the status reads unused.
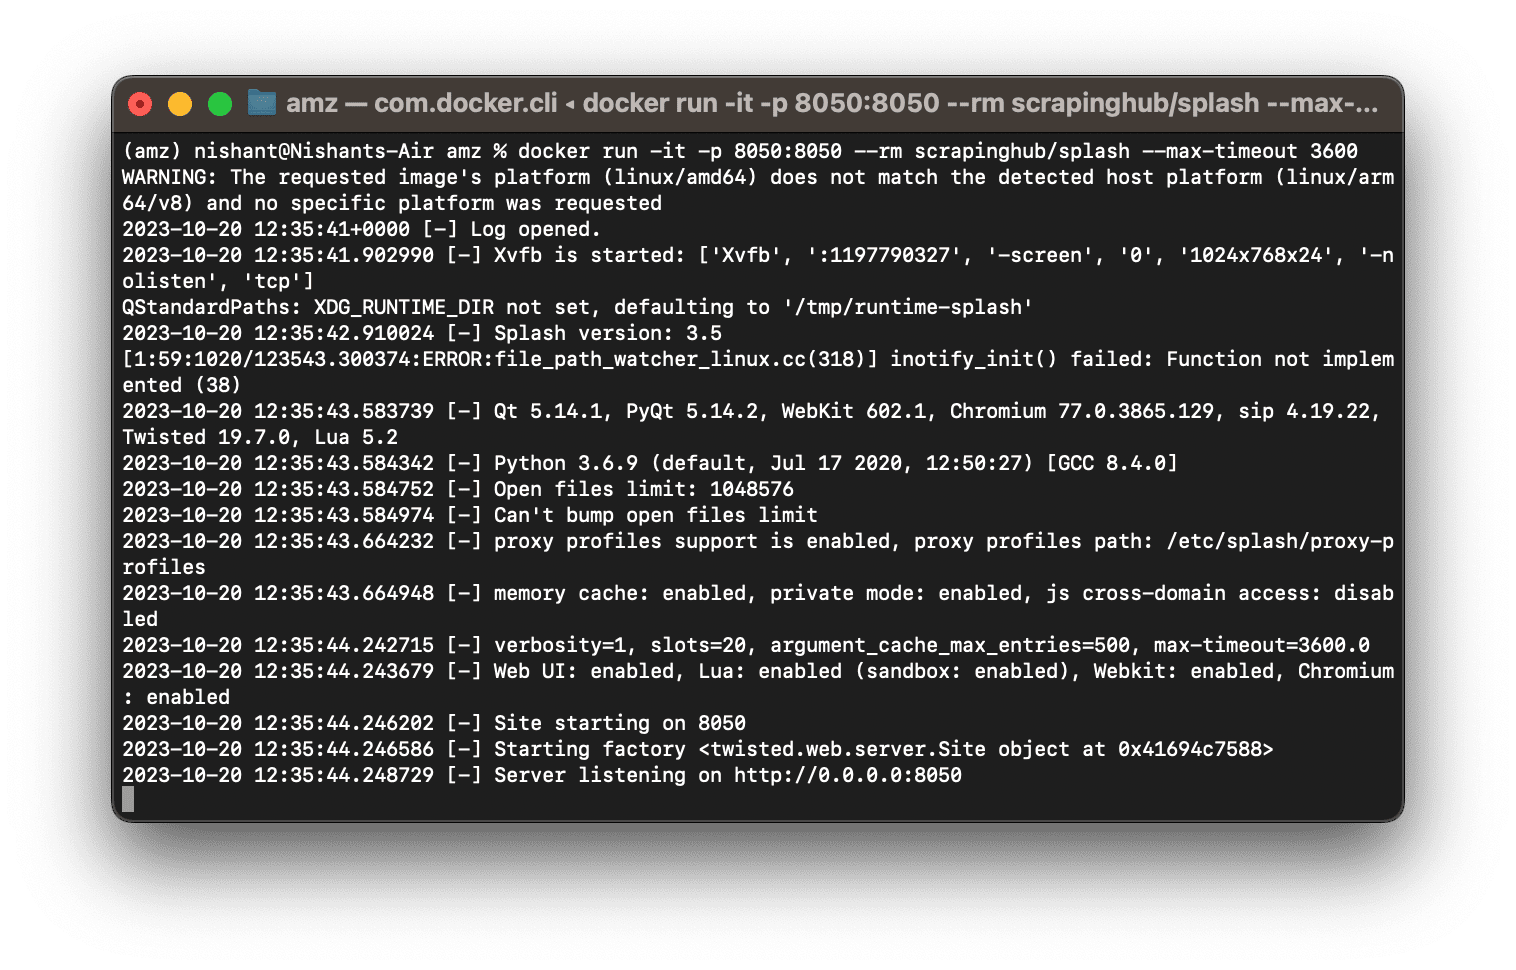
So, now it’s time to run Splash using Docker by executing the following command-
docker run -it -p 8050:8050 –rm scrapinghub/splash –max-timeout 3600
Ummm.. if you want to understand what this command does, here you go-
- docker run is to run the docker container.
- -it specifies that it should be run in an interactive mode
- -p 8050:8050 maps host port 8050 to the docker container’s port 8050. This ensures that you can access docker via localhost:8050
- -rm instructs to destroy the container once it is stopped.
- scrapinghub/splash is the name of the container image this command would fire up
- –max-timeout 3600 specifies that splash should wait up to an hour to let the pages render completely. This might feel way too much but helps to decrease the number of times you get 504 errors while trying without using IP proxy pools.
Run the command, and it will fire up the splash server listening on localhost:8050
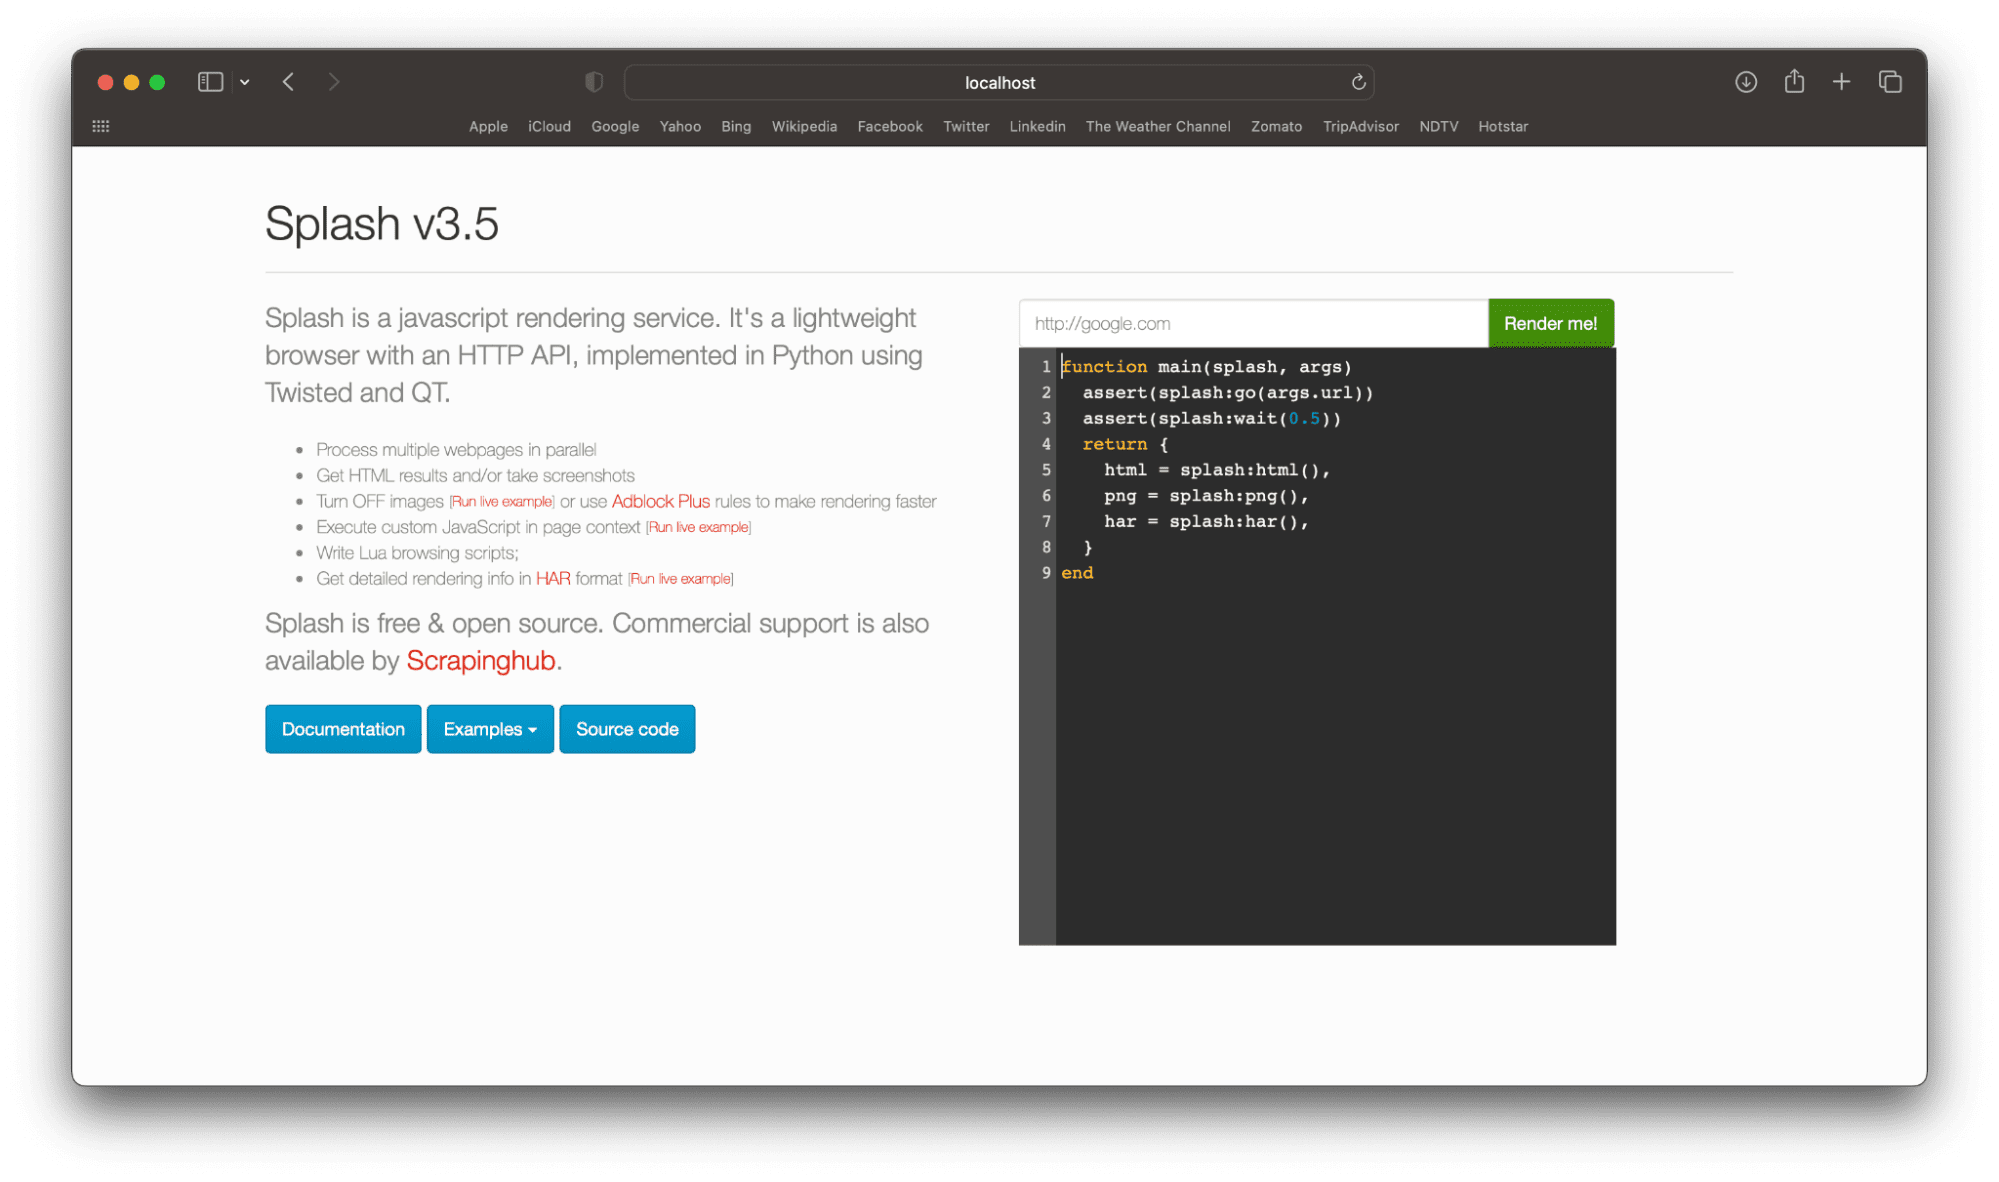
To verify that splash is running, you can either curl or check in your browser UI-
In fact, the status will change in the Docker Desktop too-

However, your goal is to scrape Amazon product reviews. Let’s get to that now.
The setup is complete now. All you have to do now is write the Amazon product reviews scraping script.
Step 5: Create a scrapy project for crawling Amazon product reviews using Python & Scrapy-Splash
-
Leave the docker terminal open for now. And launch a separate terminal.
-
Move to the Python virtual environment you created.
-
Activate the virtual environment.
-
Inside the amz folder, or whatever name you gave, create a Scrapy project by running the following command-
scrapy startproject amazonReviewsHere, amazonReviews is the folder name inside which scrapy startproject command will create its files. The name could be anything of your choice.
Here’s what we’ve done in step 5 so far.
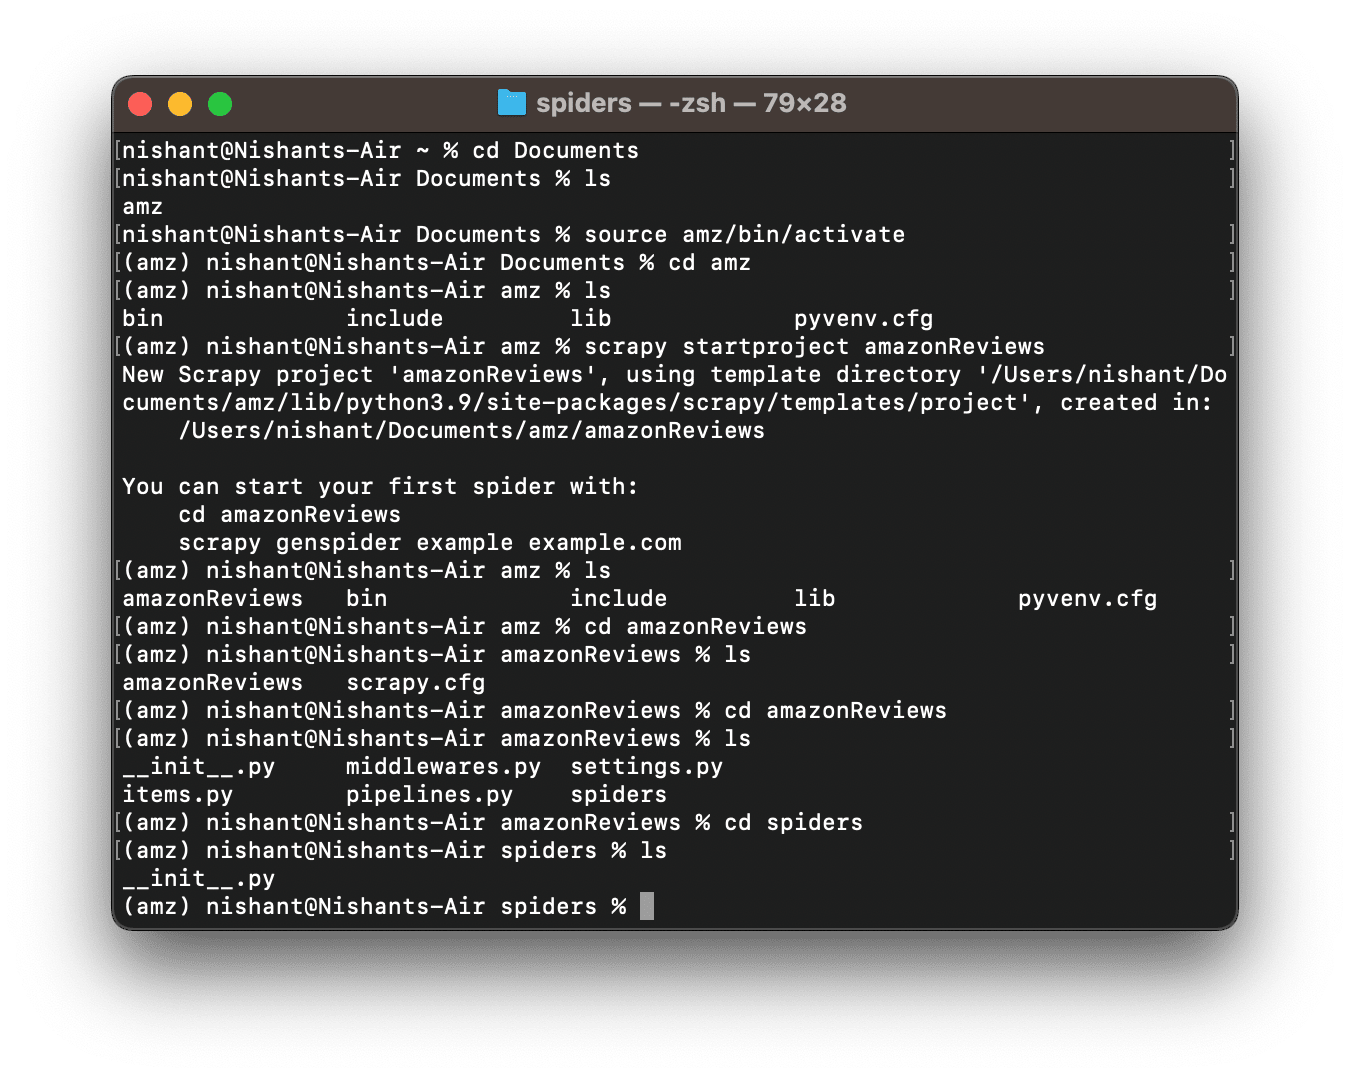
Your virtual environment scrapy folder directory looks like the following now-

- Spiders is a folder inside which you would create crawler scripts.
- Items is where you would define the models & fields for scraped data.
- Middlewares defines the methods that handle & process the requests, proxies, cookies, user agents, etcetera
- Pipelines control the flow of data, how it gets stored, and where
- Settings let you configure the Scrapy project behavior
Awesome! The scrapy project to scrape Amazon product reviews is created. Now, we need to modify a few things in the Settings.py & Items.py. You can do this after writing the crawling script too. But these are basic project hygiene, so let’s just get done with this.
Open Settings.py to edit the settings.
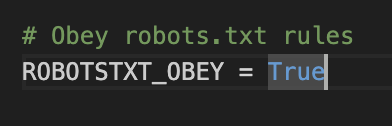
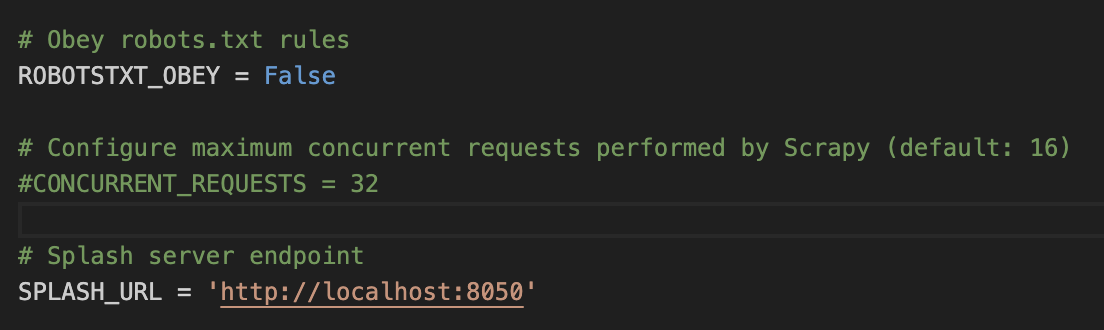
Set ROBOTSTXT_OBEY = False
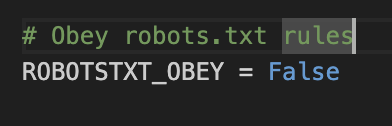
Note: This tutorial is just for educational purposes. And in the real world, you must always respect your local data laws, and policies of the target site you are scraping.
Cool. Add Splash server endpoint to the settings file:
SPLASH_URL = ‘https://localhost:8050’
Next, add the splash deduplication middleware to SPIDER_MIDDLEWARES. By default, it is commented out. So, uncomment it and then add the middleware with priority 100.
‘scrapy_splash.SplashDeduplicateArgsMiddleware’: 100
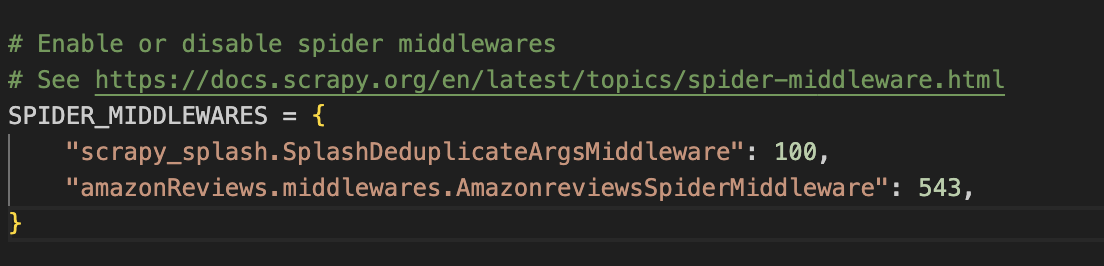
The deduplication middleware helps use resources frugally by avoiding unnecessary requests to the same URLs with the same parameters.
Thereafter, add 3 downloader middleware-
“scrapy_splash.SplashCookiesMiddleware”: 723,
“scrapy_splash.SplashMiddleware”: 725,
“scrapy.downloadermiddlewares.httpcompression.HttpCompressionMiddleware”: 810,
- At the core, the cookie middleware is useful for user session management.
- Splash middleware handles how URLs are passed from scrapy to Splash.
- The http compression middleware helps deal with compressed data and passes it to scrapy for further processing.
Also, define the Splash DupeFilter class, that helps handle duplicate requests in Splash.
DUPEFILTER_CLASS = ‘scrapy_splash.SplashAwareDupeFilter’

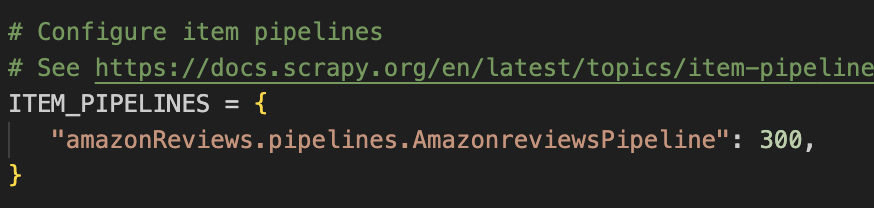
Though you won’t use item pipelines in this tutorial, it is a good idea to use them for sequentially processing scraped data. So, uncomment that as well.
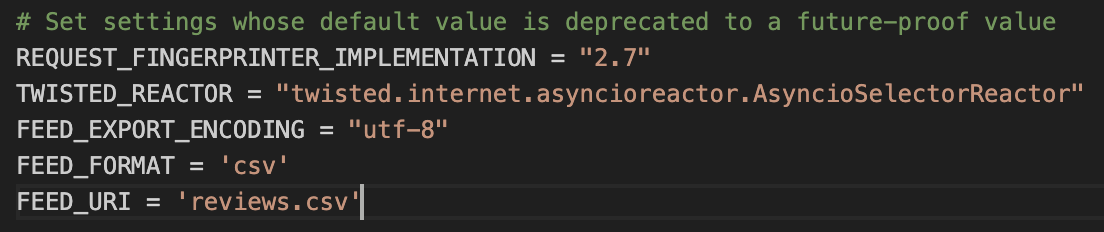
That brings us to the last modification you need to do in the settings.py file. Add FEED_FORMAT & FEED_URI
FEED_FORMAT = ‘csv’
FEED_URI = ‘reviews.csv’
Next, open items.py and define fields for scraping reviews:
authorname = scrapy.Field()
commentText = scrapy.Field()
commentTitle = scrapy.Field()
commentDate = scrapy.Field()
reviewRating = scrapy.Field()
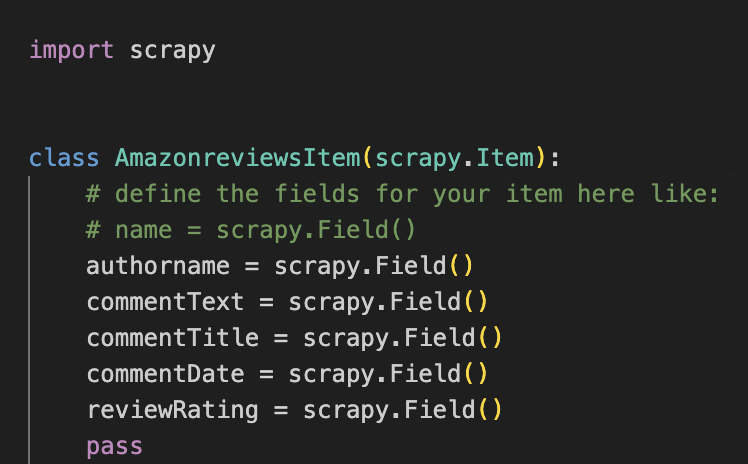
This helps us create item instances to structure the scraped data.
Now, you’re all done. And it’s time to get started scraping Amazon product reviews.
Step 6: Write the Python Scrapy-Splash Amazon product reviews scraping spider.
Move to the spiders directory and create a new file amzRev.py
You can give your own file name, just make sure that the file extension is .py
-
Import the scrapy and scrapy_splash package.
import scrapy
from scrapy_splash import SplashRequest
-
Import AmazonreviewsItem class for creating Item instances.
from ..items import AmazonreviewsItem
-
Inherit Scrapy’s base spider class, and define a name variable in it which will be used to execute the spider from the command line.
class AmazonReviewsSpider(scrapy.Spider):
name = “amazonReview”
Within this class, you need to create 3 methods.
-
The first function is the start_requests method, which will be the entry point for the crawler.
def start_requests(self):
yield SplashRequest(
url=signin_url,
callback=self.crawl_product,
endpoint=‘execute’,
args={
‘width’: 1000,
‘lua_source’: lua_script,
‘timeout’: 3600,
‘ua’: “Mozilla/5.0 (Macintosh; Intel Mac OS X 10_15_7) AppleWebKit/537.36 (KHTML, like Gecko) Chrome/109.0.0.0 Safari/537.36”
},
)
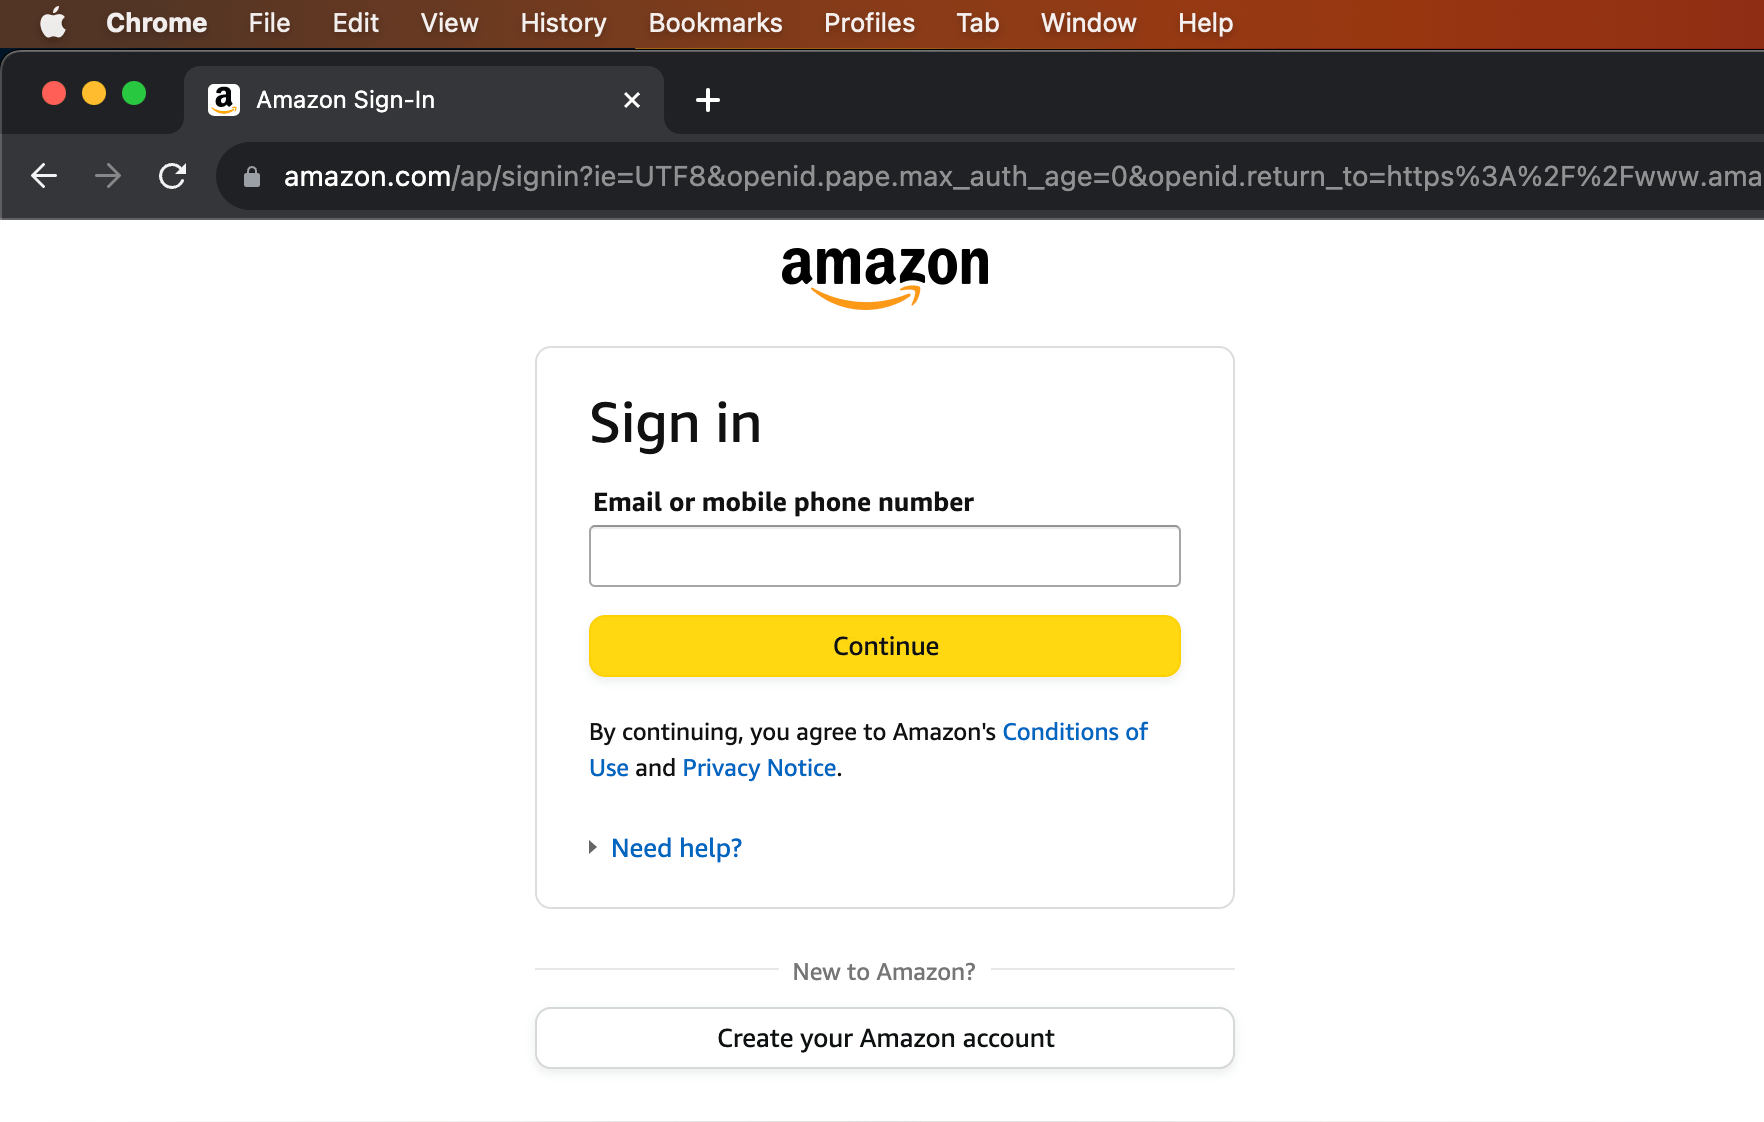
The login_url variable holds the value of Amazon’s login page URL. Verify that it is the same for you. Or replace it with the right one.
Then you create a SplashRequest with parameters
- url (to pass the login url)
- callback (which function needs to be called for processing the response of this SplashRequest)
- endpoint (splash endpoint to use i.e., execute endpoint to process lua script)
- args to specify the viewport for lua script execution, lua_source to specify the script, timeout to specify the maximum waiting time for Splash server to render the url, and user-agent (to avoid getting detected as a bot or blocked)
Before you write the next methods, write the Lua script to sign in to Amazon.
The following line is the entry point for Lua script execution. It has a splash object, and args with parameter values passed with SplashRequest.
function main(splash, args)
This initializes cookies from splash objects for session handling.
splash:init_cookies(splash.args.cookies)
This increases the splash browser viewport to full width.
splash:set_viewport_full()
The below code makes Splash fetch the URL passed as an argument to the SplashRequest i.e., the sign-in URL. After Splash renders that page, it will wait for 5 seconds.
assert(splash:go(args.url))
assert(splash:wait(5))
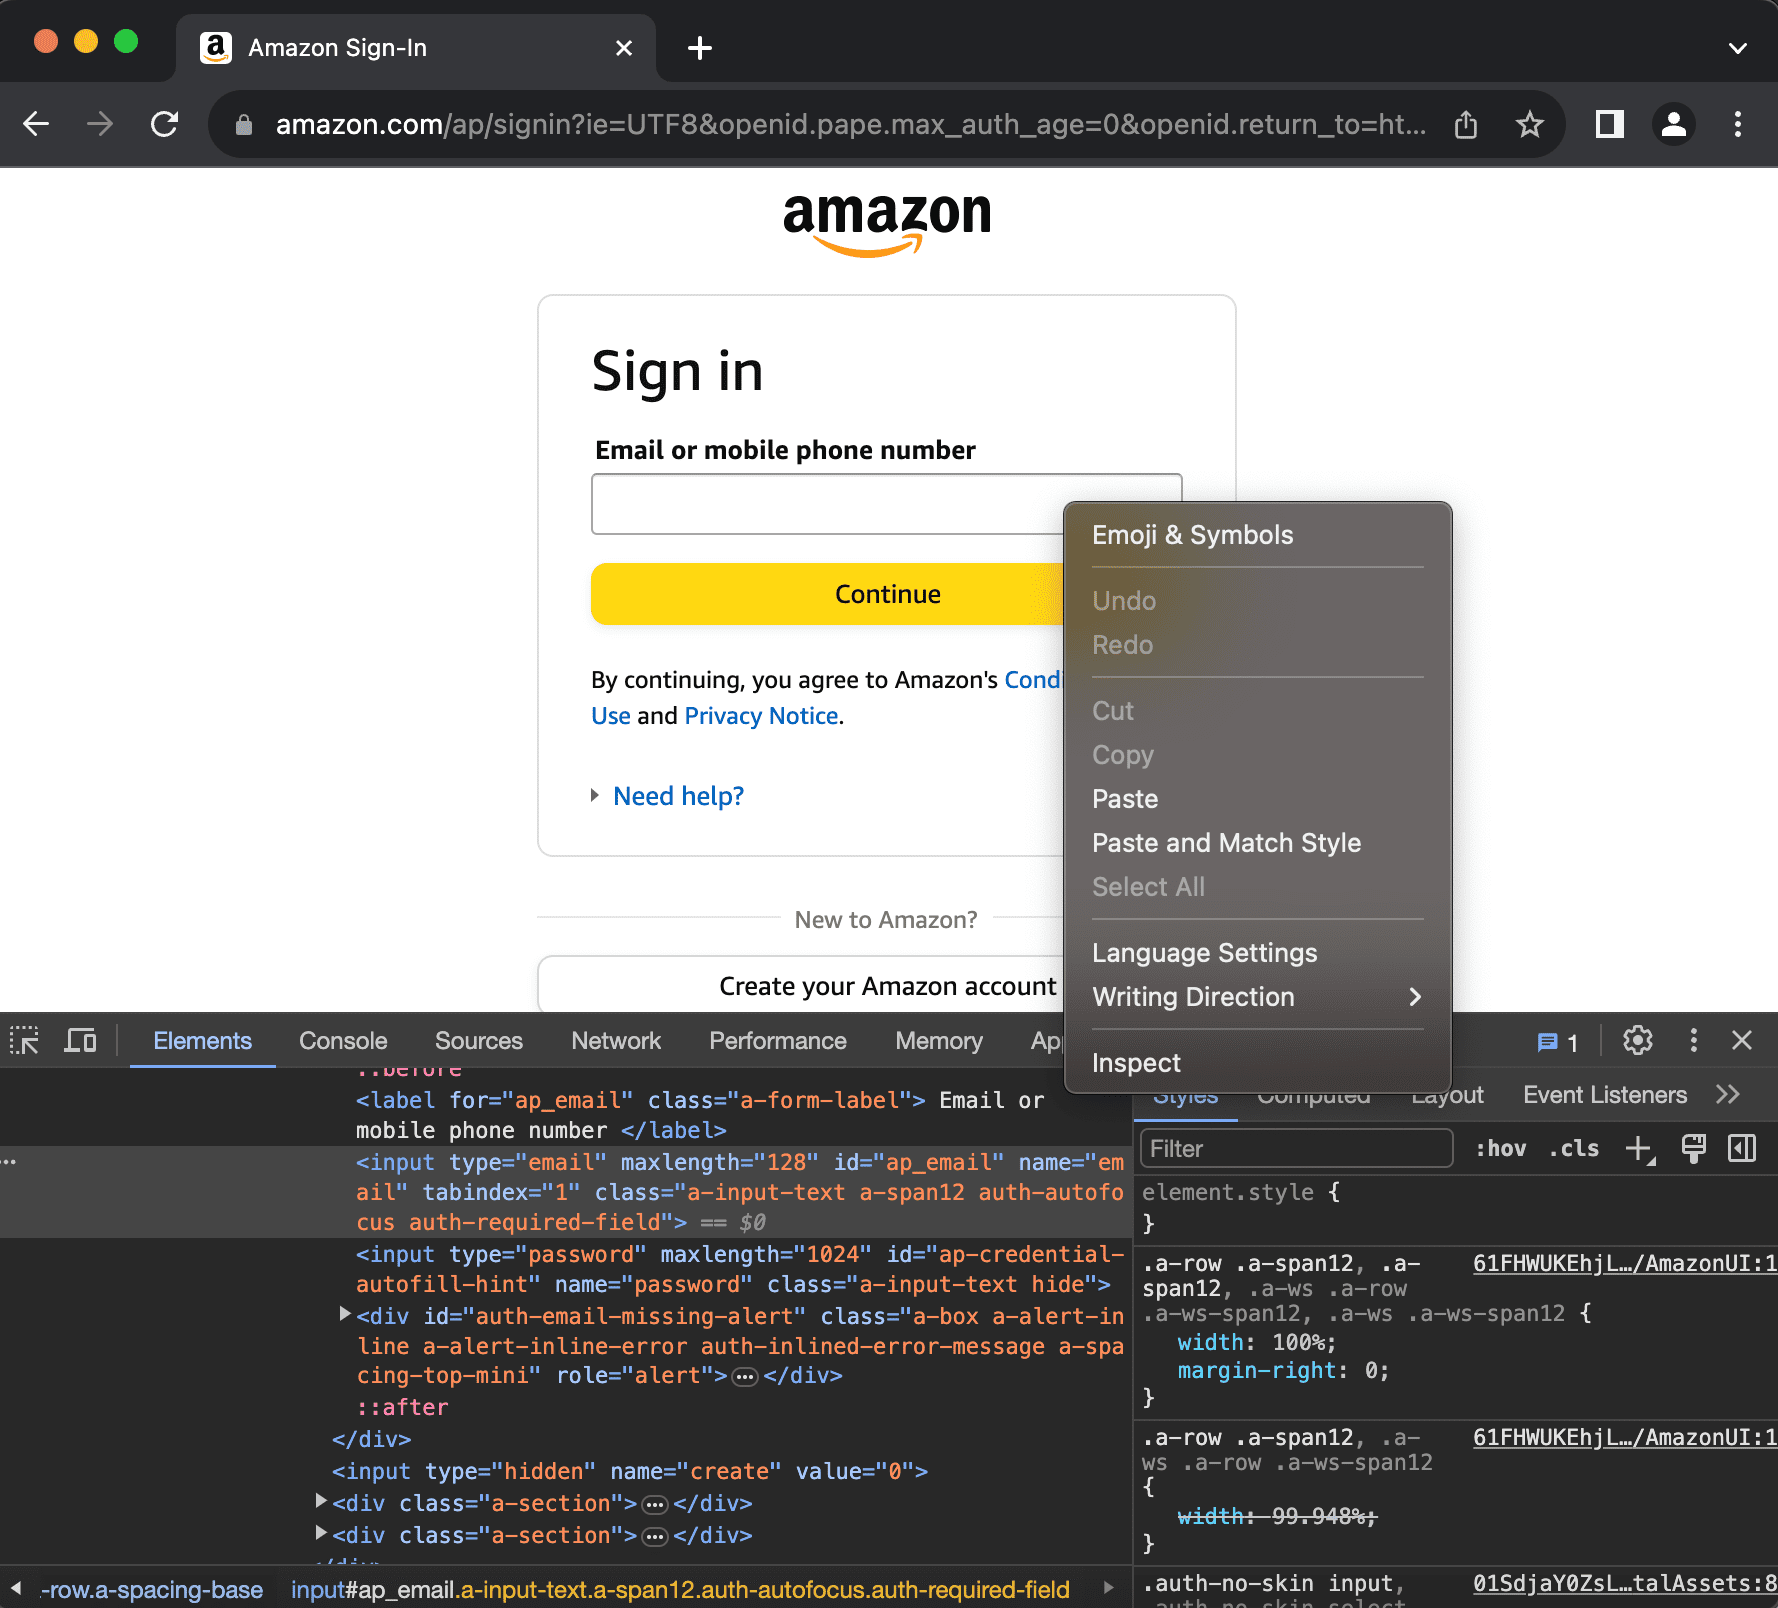
Next, we need to inspect the sign in page of amazon and find the input field identifiers.
The below code defines a local variable in the current context only within the Lua script. This variable now holds reference to an element that the select method of splash object has identified using the specified conditions i.e., an HTML input element with its name attribute value as ‘email’.
local email_input = splash:select(‘input[name=email]’)
If you right-click the email input box and click inspect, it will pop-open the developer console in Chrome, and you can see that the input HTML element has the name value ‘email’.
Next, in the code below, replace your_email_address with your actual Amazon email ID using which you wish to log in and scrape products. This code will enter the email ID in the input field, and again it will wait for 5 seconds. The waits have been specified to avoid getting blocked, as with this tutorial you are only using one IP address i.e., your local system’s IP. If you’re using proxy rotator services, you can skip the wait times.
email_input:send_text(“your_email_address”)
assert(splash:wait(5))
Now, this code will instruct Splash to create a reference for the continue button. Then, it clicks that button.
local email_submit = splash:select(‘input[id=continue]’)
email_submit:click()
assert(splash:wait(7))
Similarly, the following Lua script lines first identify an input field for the password, create a reference to the same, and pass the specified password to the input field.
local password_input = splash:select(‘input[name=password]’)
password_input:send_text(“your_password”)
assert(splash:wait(6))
local password_submit = splash:select(‘input[id=signInSubmit]’)
password_submit:click()
assert(splash:wait(7))
You can inspect the password input identifiers in the Google developer console as below-
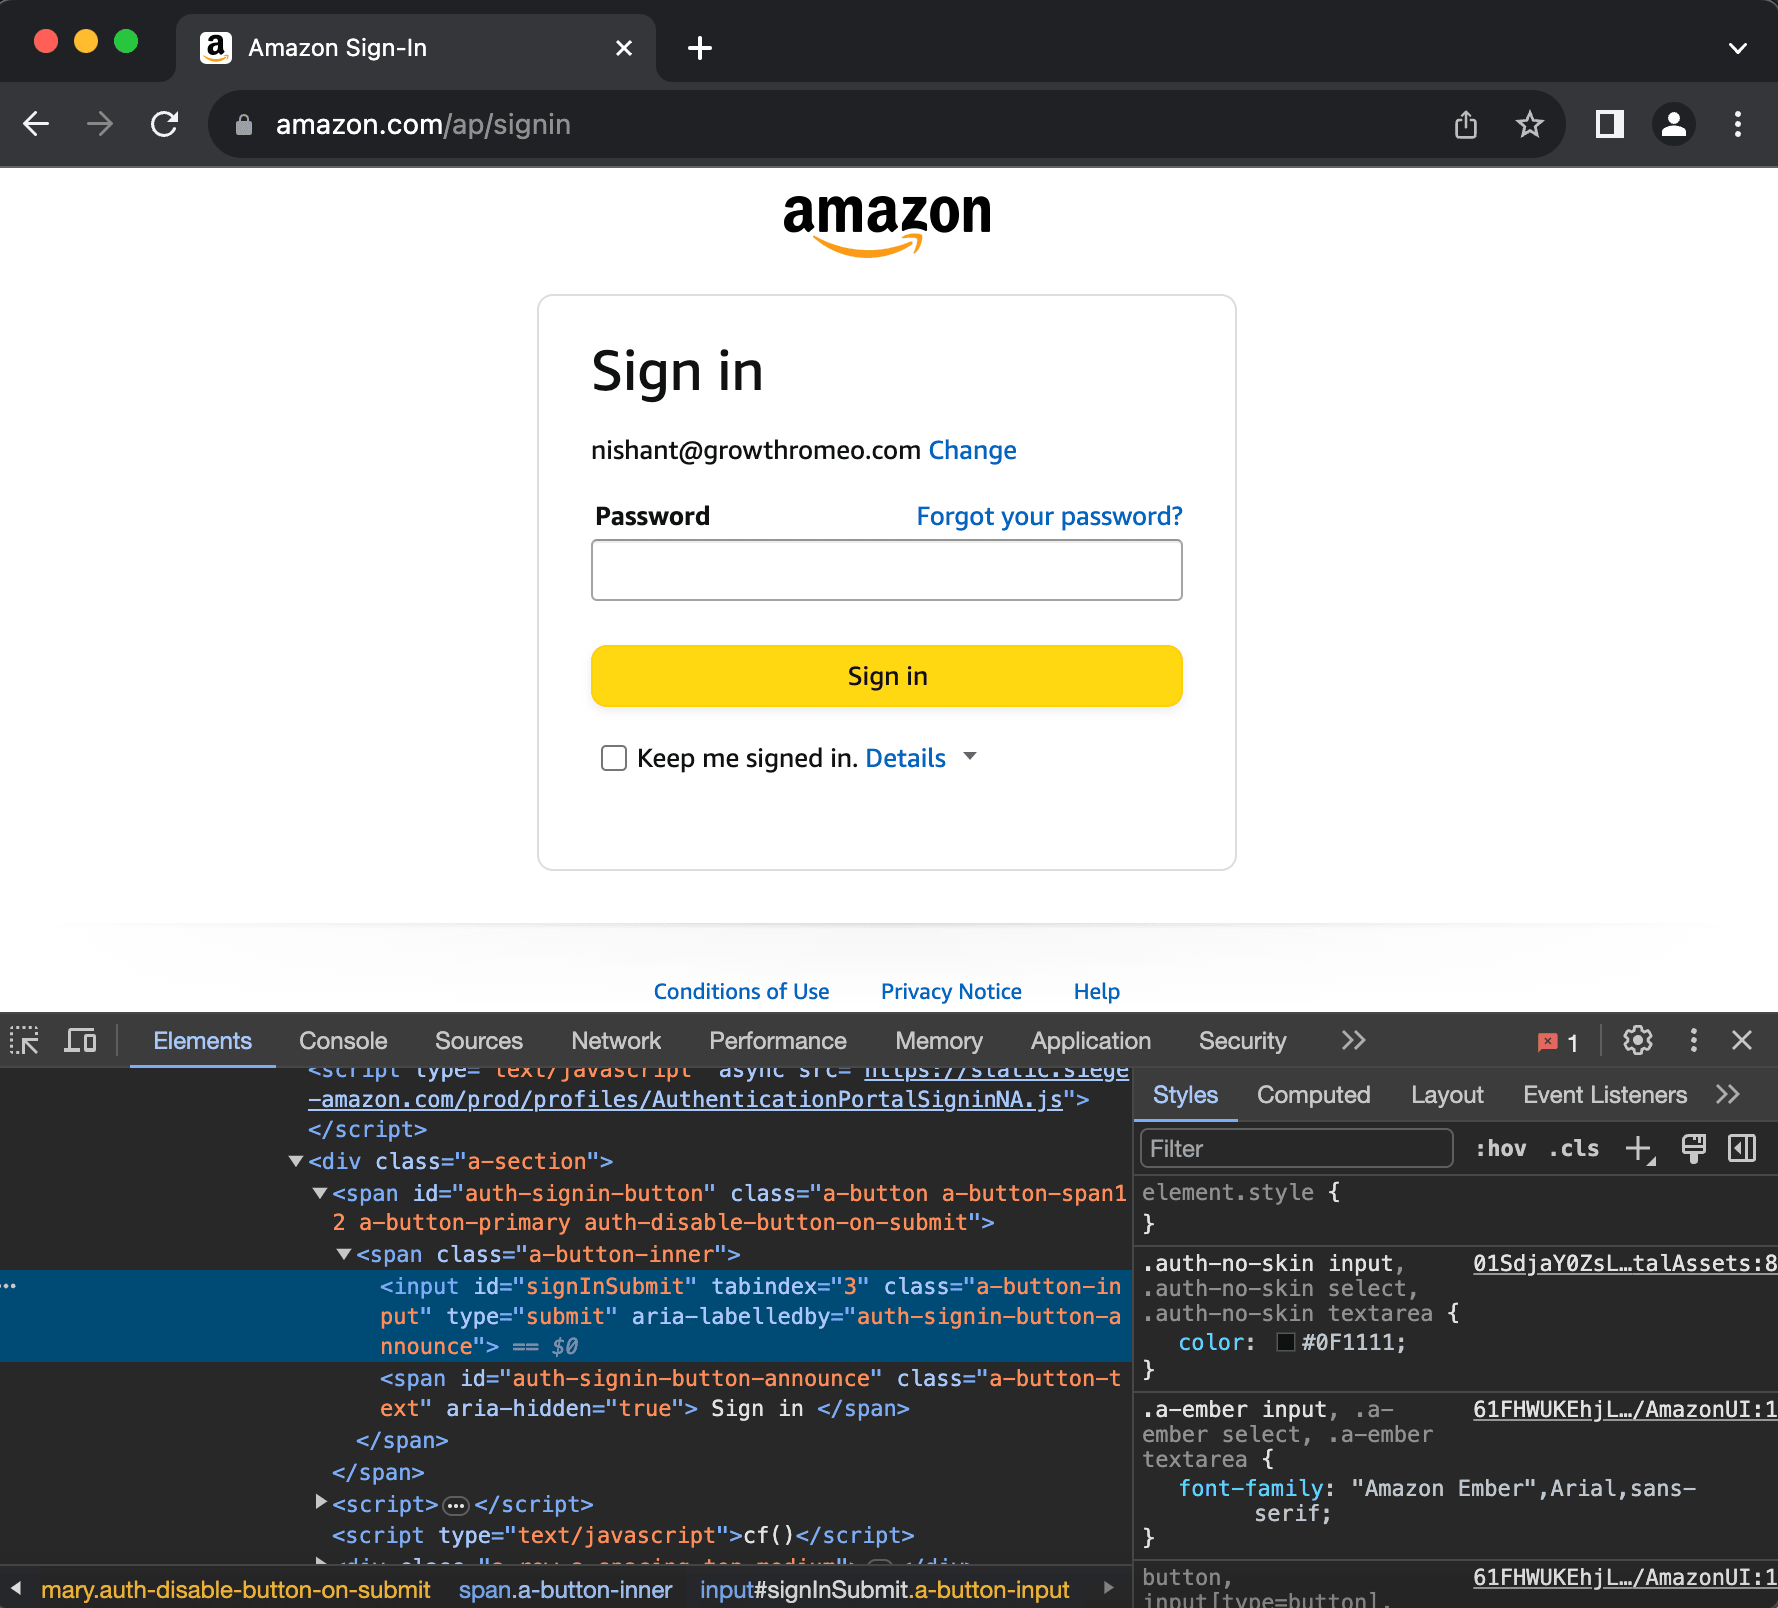
The script then identifies the Sign in submit button and clicks it.
return {
html=splash:html(),
url = splash:url(),
cookies = splash:get_cookies(),
}
end
Lastly, the html response, the url, and the cookies are passed on as args to the callback function crawl_product.
Note: This is the standard way to login using Splash Scrapy. But this won’t always result in successful logins. Sometimes, Amazon asks for two factor authentication (2FA) pins/code, or it asks to solve a captcha, and multiple other issues pop-up once you start doing things at scale. Addressing all those issues here in this post wouldn’t be possible. But I believe you got a fair idea around the approach. Anyway, for scraping product reviews you don’t need to login into Amazon. But the websites, where you do need to login, this could be your approach. As this is just a tutorial blog, we would refrain from diving deep into cracking captchas or 2FA.
- The second function is the crawl_product method that fetches the HTML response of Amazon’s product page with the session cookies data from the Lua script. It passes the response to the parse_product method.
def crawl_product(self,response):
cookies_dict = {cookie[‘name’]: cookie[‘value’] for cookie in response.data[‘cookies’]}
url_list = [‘https://www.amazon.com/ENHANCE-Headphone-Customizable-Lighting-Flexible/dp/B07DR59JLP/’]
for url in url_list:
yield scrapy.Request(url=url, cookies=cookies_dict, callback=self.parse_product)
- Third, a parse_product method that will scrape and yield review items. It first finds all the reviews on the product landing page, and then enumerates on it to extract individual review data. The Xpath parenthesis comprises respective Xpaths for each review item field.
def parse_product(self, response):
try:
review_list = response.xpath(‘//div[contains(@id, “dp-review-list”)]/div’)
review_count = len(review_list)
for review_number in range (1, review_count+1):
items = AmazonreviewsItem()
items[‘authorname’] = response.xpath(‘//div[contains(@id, “dp-review-list”)]/div[‘ + str(review_number) + ‘]//span[contains(@class,”name”)]/text()’).get()
items[‘reviewRating’] = response.xpath(‘//div[contains(@id, “dp-review-list”)]/div[‘ + str(review_number) + ‘]//i[contains(@class,”rating”)]/span/text()’).get()
items[‘commentTitle’] = response.xpath(‘//div[contains(@id, “dp-review-list”)]/div[‘ + str(review_number) + ‘]//a[contains(@class,”title”)]/span/text()’).get()
items[‘commentDate’] = response.xpath(‘//div[contains(@id, “dp-review-list”)]/div[‘ + str(review_number) + ‘]//span[contains(@class,”date”)]/text()’).get()
items[‘commentText’] = response.xpath(‘//div[contains(@id, “dp-review-list”)]/div[‘ + str(review_number) + ‘]//div[contains(@class,”reviewText”)]/span/text()’).get()
yield items
except Exception as e:
self.log(f’An error occurred: {str(e)}’)
Now, everything you need to scrape Amazon product reviews is ready.
It’s scraping time.
Head to the terminal where you have the Python virtual environment activated. From the project’s top-level directory i.e., the directory that contains the Spider folder.
Run the command
scrapy crawl amazonReview
Note, amazonReview was the name we gave to our crawler. On successful execution, you will see something similar to the following on your terminal-
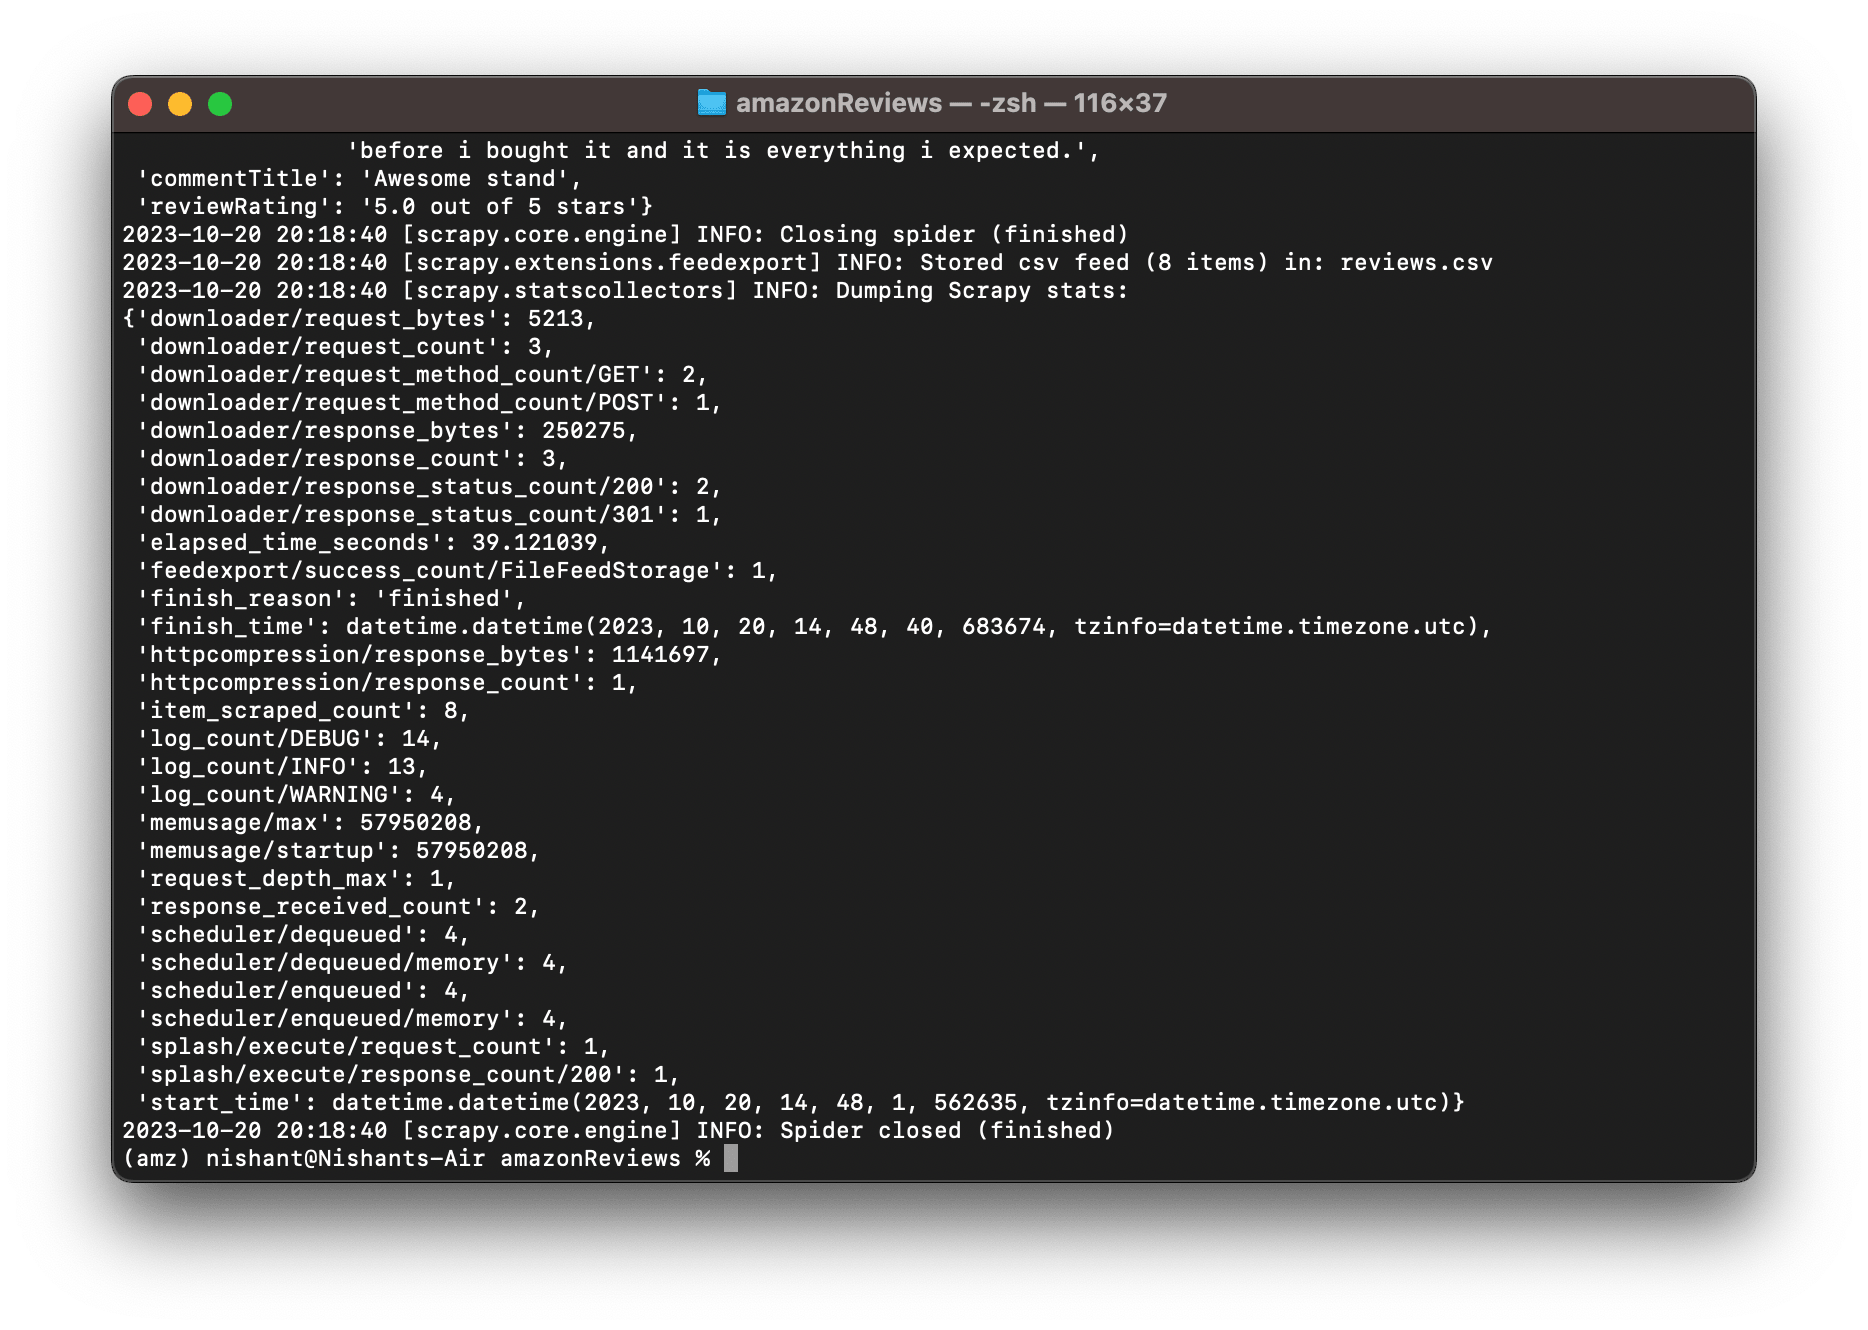
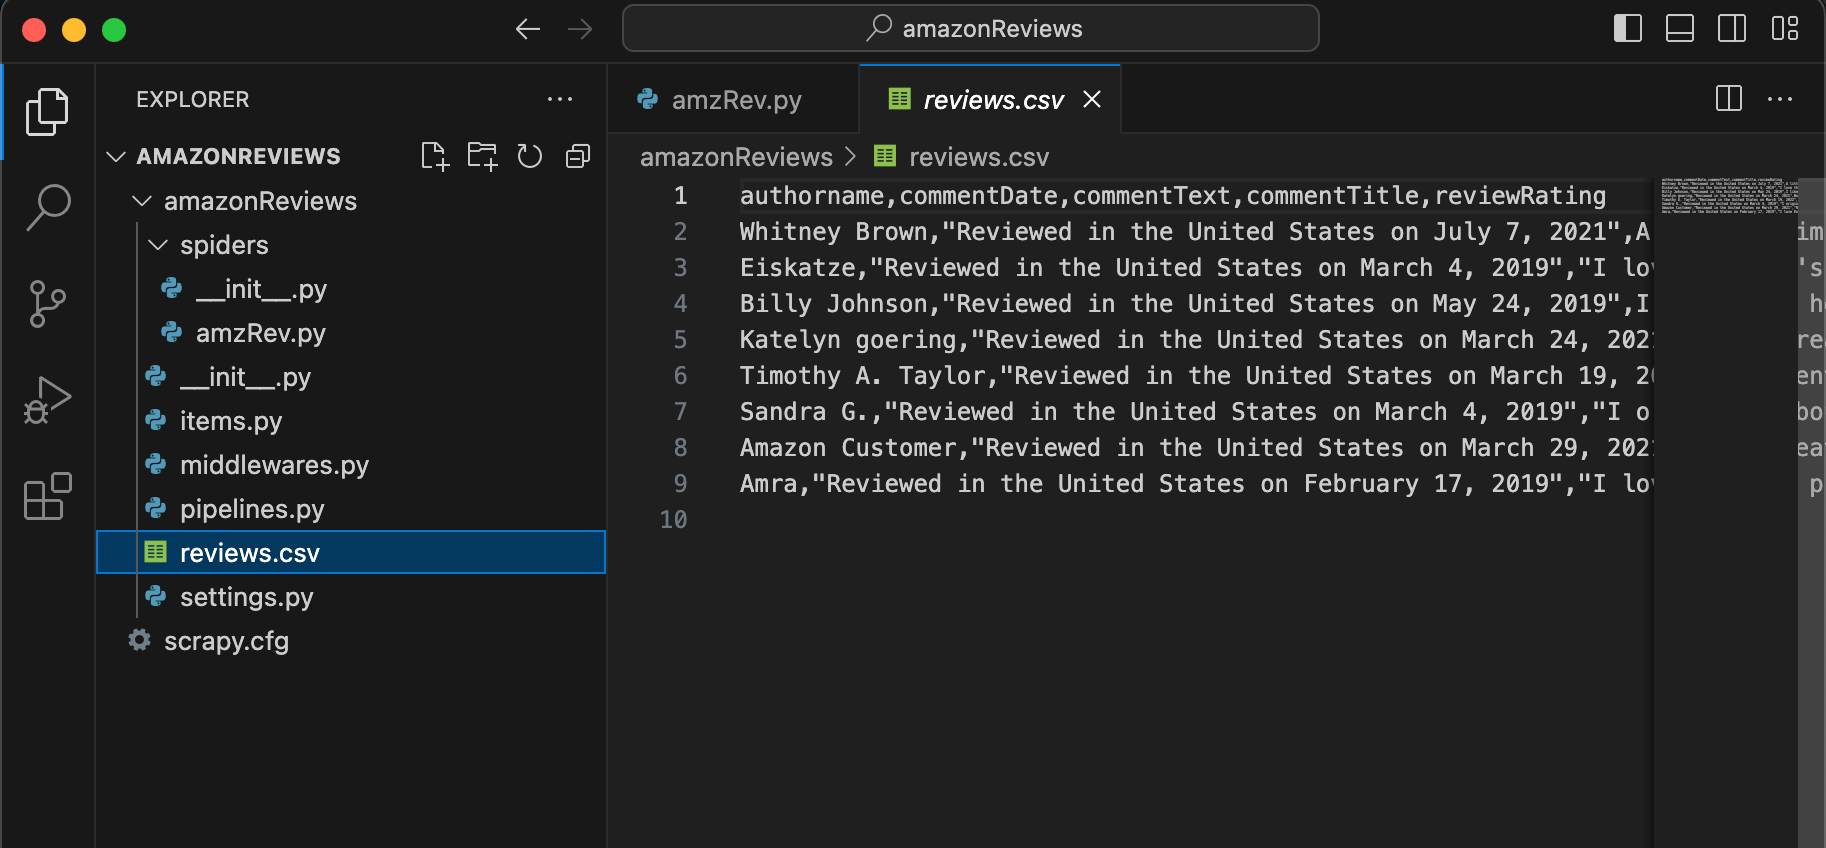
In your Python virtual environment directory, you’ll find a new reviews.csv file-
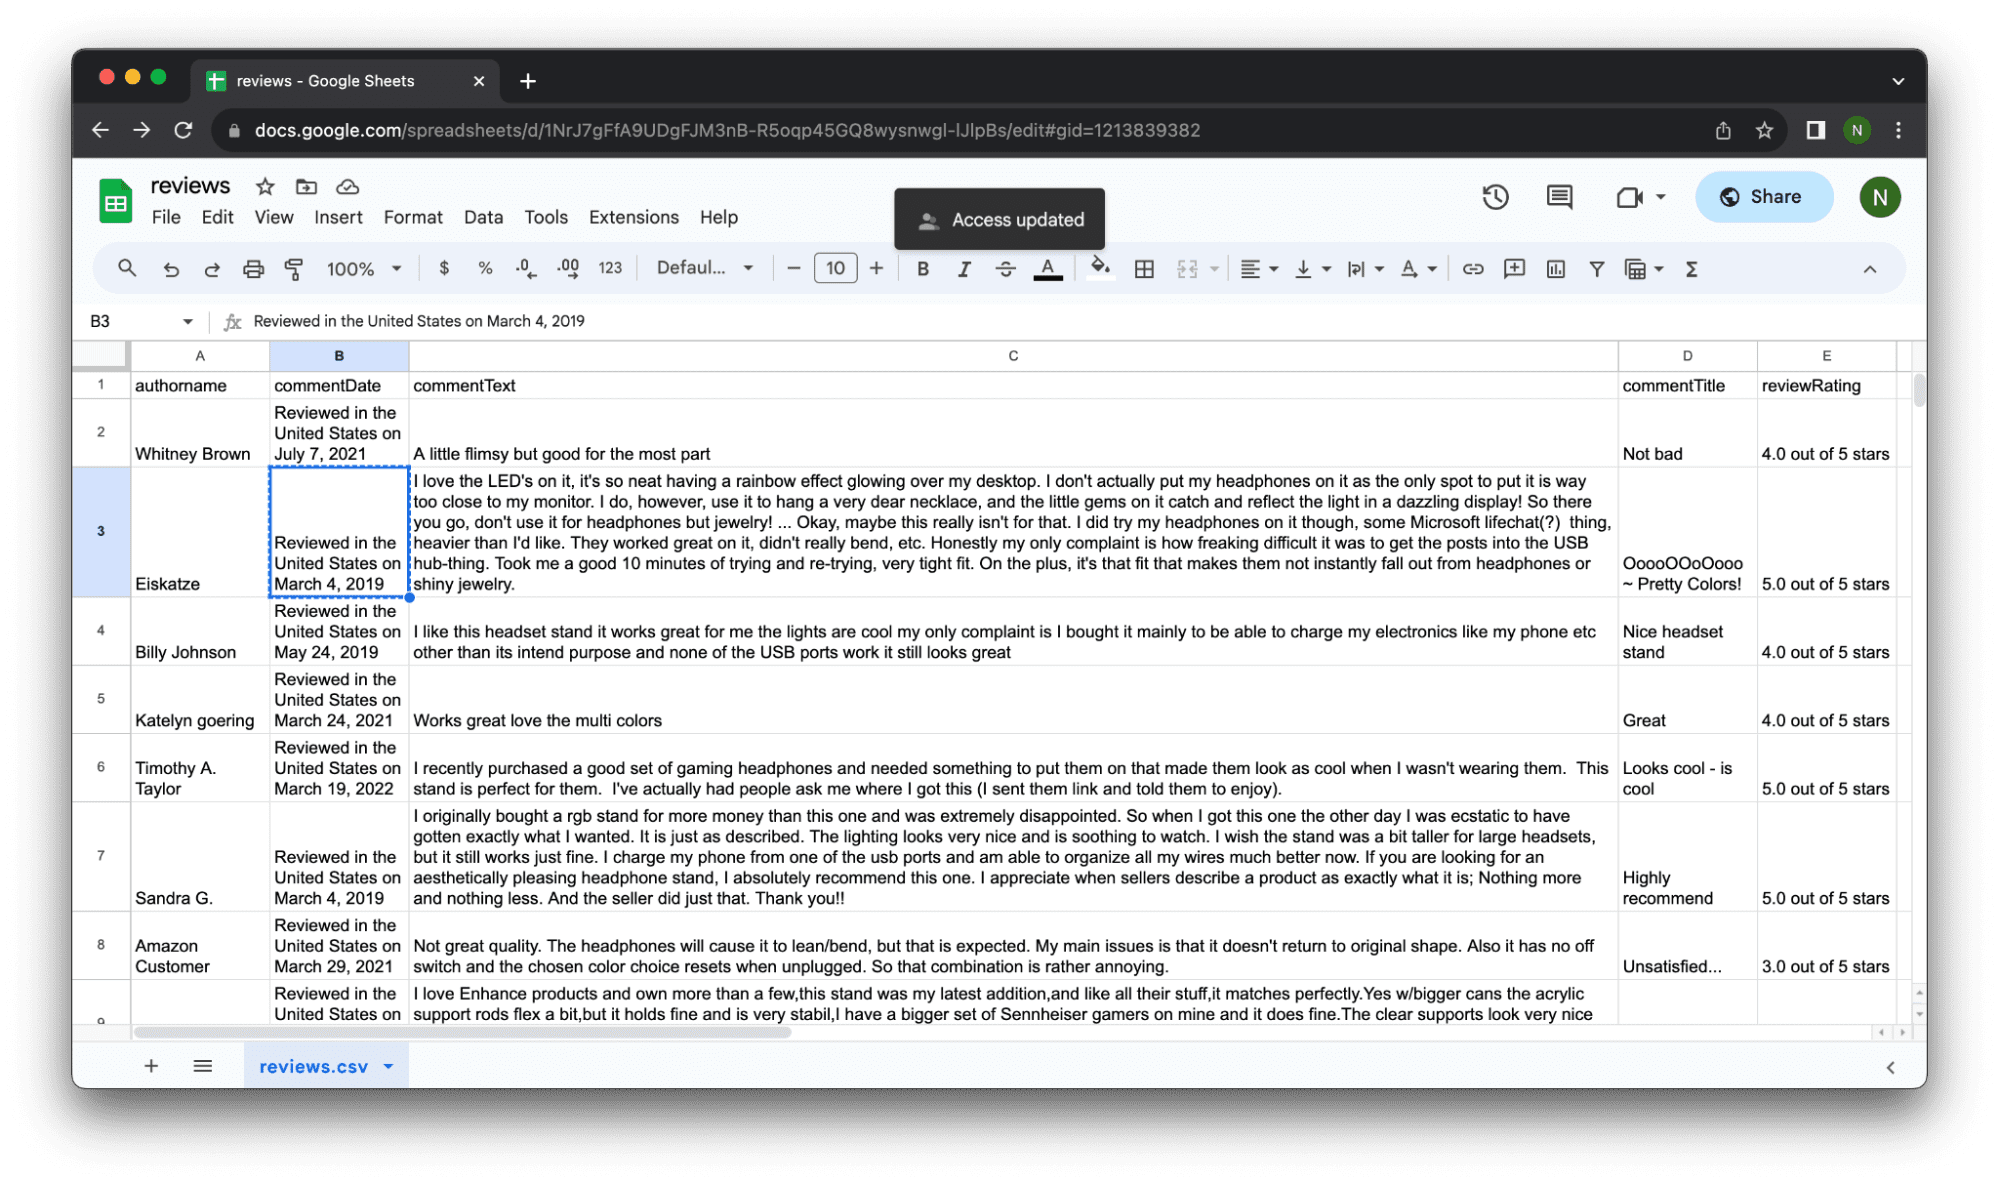
Open this with Google sheet, and you’ll find your structured data-
To stop the docker splash server. Get the docker container ID by running the command
docker ps
Copy the container_ID, and run the command
docker stop container_ID
Note: replace the container_ID with your actual splash container ID.

Python Script for Scraping Amazon Product Reviews Using Scrapy & Splash
import scrapy
from scrapy_splash import SplashRequest
from ..items import AmazonreviewsItem
lua script to automate the login part by imitating email input & password input
lua_script = “””
function main(splash, args)
splash:init_cookies(splash.args.cookies)
splash:set_viewport_full()
assert(splash:go(args.url))
assert(splash:wait(5))
local email_input = splash:select(‘input[name=email]’)
email_input:send_text(“nishant@growthromeo.com”)
assert(splash:wait(5))
local email_submit = splash:select(‘input[id=continue]’)
email_submit:click()
assert(splash:wait(7))
local password_input = splash:select(‘input[name=password]’)
password_input:send_text(“Amz$ucks012”)
assert(splash:wait(6))
local password_submit = splash:select(‘input[id=signInSubmit]’)
password_submit:click()
assert(splash:wait(7))
return {
html=splash:html(),
url = splash:url(),
cookies = splash:get_cookies(),
}
end
“””
class AmazonReviewsSpider(scrapy.Spider):
# inherit scrapy base class
# give the name to use for ‘scrapy crawl projectName’ command
name = “amazonReview”
# entry point for scrapy crawler execution
def start_requests(self):
# enter the amazon sign in url
# splash request that will execute lua script and pass the response to crawl_product
yield SplashRequest(
url=login_url,
callback=self.crawl_product,
endpoint=‘execute’,
args={
‘width’: 1000,
‘lua_source’: lua_script,
‘timeout’: 3600,
‘ua’: “Mozilla/5.0 (Macintosh; Intel Mac OS X 10_15_7) AppleWebKit/537.36 (KHTML, like Gecko) Chrome/109.0.0.0 Safari/537.36”
},
)
def crawl_product(self, response):
# create a cookie dictionary to be used in scrapy request object that fetches the products page
cookies_dict = {cookie[‘name’]: cookie[‘value’] for cookie in response.data[‘cookies’]}
# the product we use to demonstrate review scraping
url_list = [‘https://www.amazon.com/ENHANCE-Headphone-Customizable-Lighting-Flexible/dp/B07DR59JLP/’]
# create requests for the specified product urls
for url in url_list:
yield scrapy.Request(url=url, cookies=cookies_dict, callback=self.parse_product)
def parse_product(self, response):
# using xpath identify and get the data for different reviews
try:
review_list = response.xpath(‘//div[contains(@id, “dp-review-list”)]/div’)
review_count = len(review_list)
for review_number in range (1, review_count+1):
items = AmazonreviewsItem()
items[‘authorname’] = response.xpath(‘//div[contains(@id, “dp-review-list”)]/div[‘ + str(review_number) + ‘]//span[contains(@class,”name”)]/text()’).get()
items[‘reviewRating’] = response.xpath(‘//div[contains(@id, “dp-review-list”)]/div[‘ + str(review_number) + ‘]//i[contains(@class,”rating”)]/span/text()’).get()
items[‘commentTitle’] = response.xpath(‘//div[contains(@id, “dp-review-list”)]/div[‘ + str(review_number) + ‘]//a[contains(@class,”title”)]/span/text()’).get()
items[‘commentDate’] = response.xpath(‘//div[contains(@id, “dp-review-list”)]/div[‘ + str(review_number) + ‘]//span[contains(@class,”date”)]/text()’).get()
items[‘commentText’] = response.xpath(‘//div[contains(@id, “dp-review-list”)]/div[‘ + str(review_number) + ‘]//div[contains(@class,”reviewText”)]/span/text()’).get()
yield items
except Exception as e:
self.log(f‘An error occurred: {str(e)}‘)
Conclusion
You can scrape Amazon product reviews using Scrapy & Splash. But doing it yourself at scale can sometimes be very challenging, esp bypassing anti-bot technologies like Captcha and fingerprint JS, a sophisticated AI-powered bot detection system adds to the headache. That’s exactly where dataFlirt comes in and kisses away most of your pain, if not all.
You can contact dataFlirt for end-to-end web scraping needs. We have experience dealing with WAF bypass, CAPTCHA bypass, geolocation-based IPs, and whatnot. Reach out today. Leverage our services to scrape Amazon product reviews, and then feed the review data to your ETL pipelines for performing ML/AI-led sentiment analysis on the review data.
Happy Scraping!